Campuscura Online Lecturer Portal
printing class registers, and
managing attachment marks?
Look no further!
The Campuscura Online Lecturer Portal is here to simplify your academic life.
Lecturerperform the following tasks:Capture Students MarksCapture Students AttendanceCapture Attachment MarksPrint Class Register
Campuscura lecturer Module gives you two good options to Capture Marks.
Prerequisite
-
Make sure the units you are takingare allocated to you. -
Make sure you are able to
print class register.
How to Sign In ?
Prerequisite
-
You need your
User Id.Ask System Admin to create for you if you don't have. -
You need your
secret initial password.Ask System Admin to create for you if you don't have. -
On your institution website
A LINKis provided to navigate toCAMPUSCURA ONLINE SYSTEM
-
When you
Clickon that link it willNavigatetoCAMPUSCURALoading Page.Then You are home and dry.
-
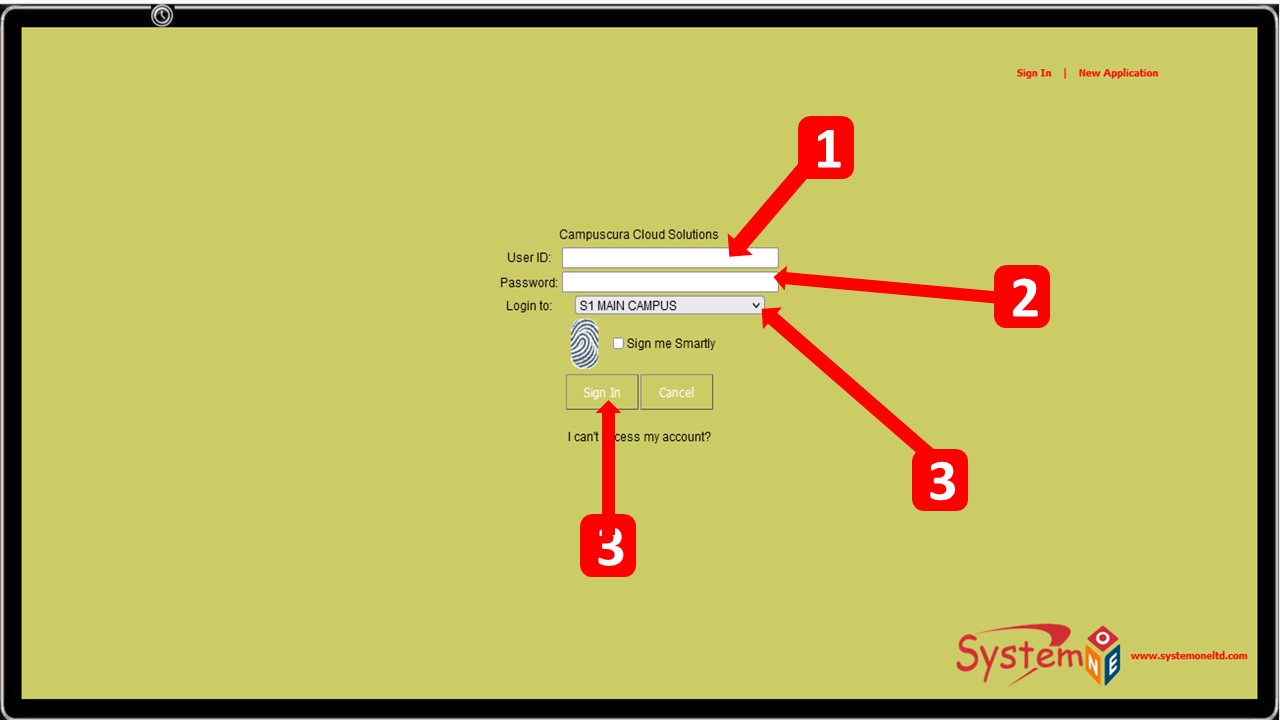
Sign In FormUSER ID and passwordare required to login/signin.-
Enter
your user idas shown onstep 1below. -
Enter
your passwordas shown onstep 2below. -
Select
your CAMPUSif your institution have more than one CAMPUS as shown onstep 3below. -
Click
SIGN INas shown onstep 4below. orPRESS ENTER KEY
-
Change Password
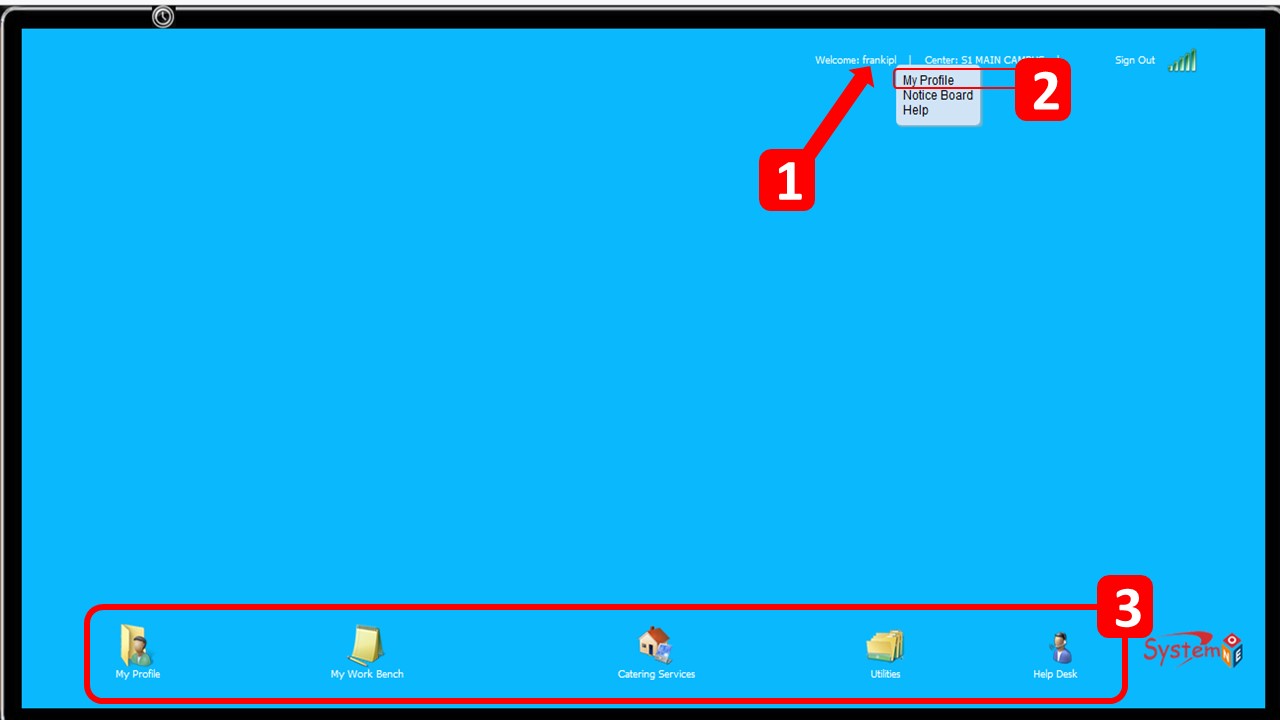
The Screen below shows a Lecturer's Screen after a successful log in
-
To quickly
changeyourPasswordHOVERyour cursor overyour User Nameas shown below onSTEP 1.Click onMy Profile.-
To Change your password Click on
My Profile on this guideas shown onstep 2below and follow the steps enumerated. -
on
step 3it shows the main navigation menu.
-

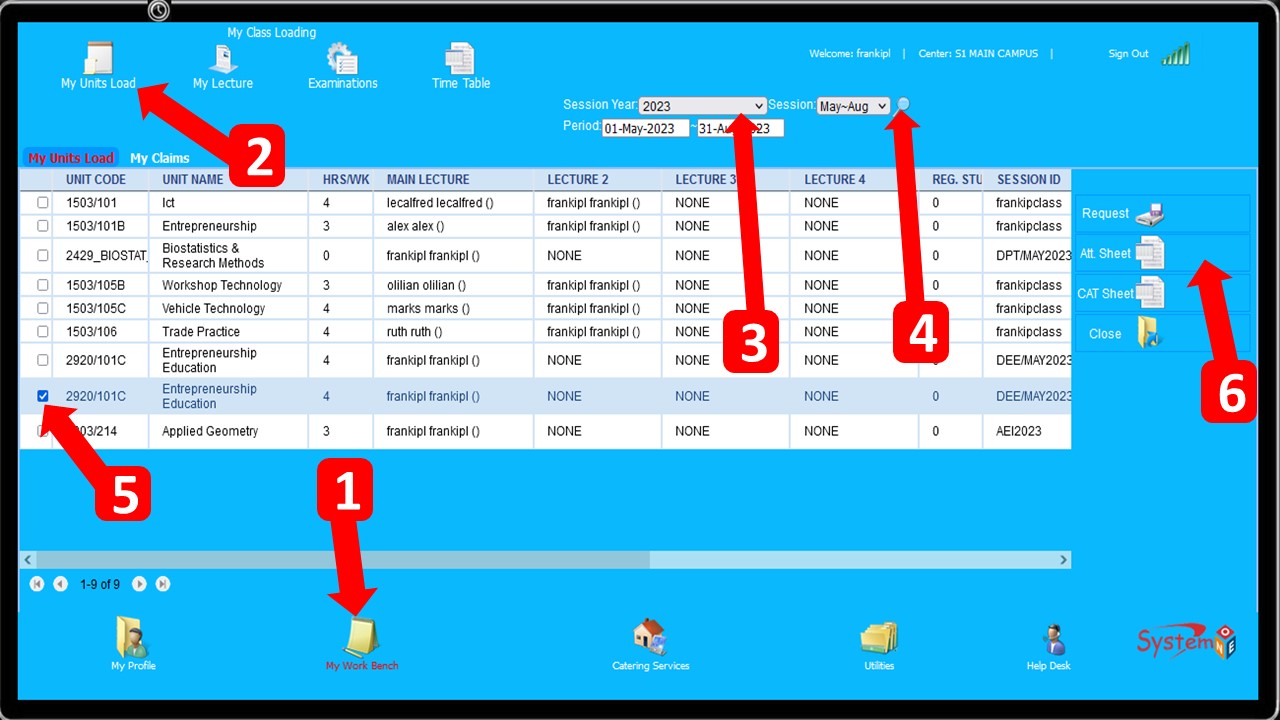
Units Loads
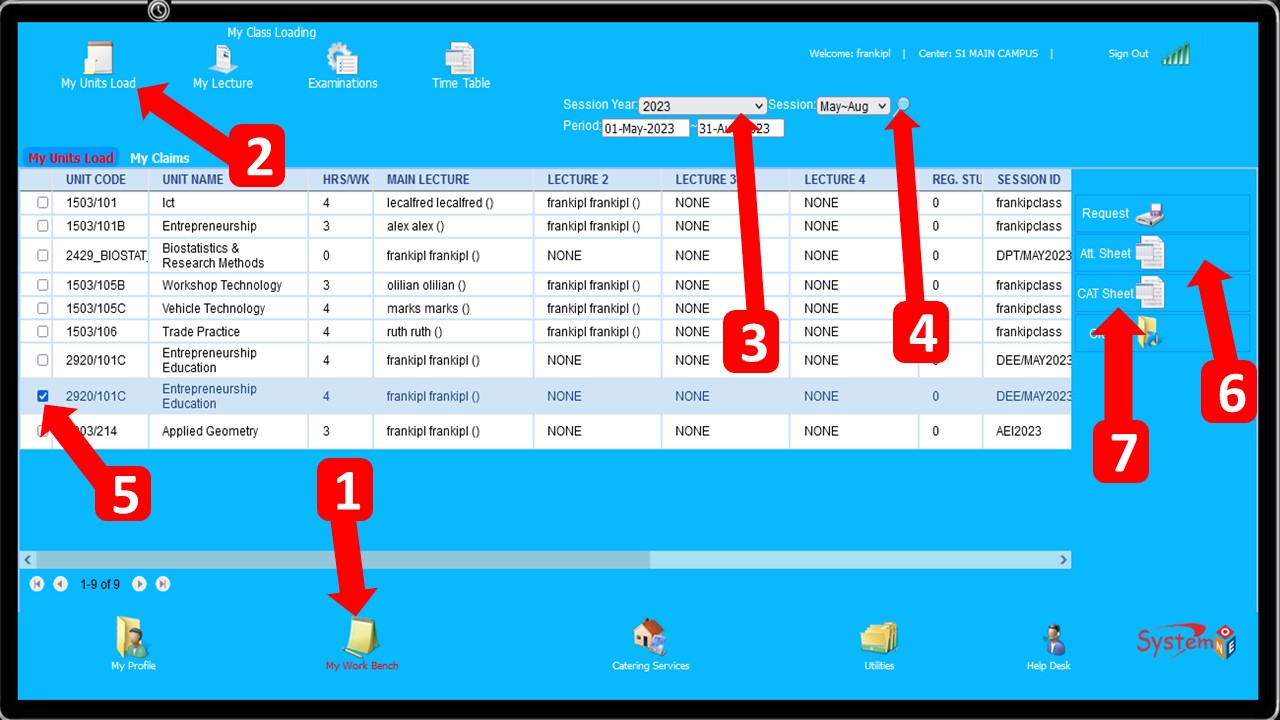
The Screen below shows a Lecturer's Units Loads/Allocation
-
Click on
My Work Bench(STEP 1)thenUnits Loads (step 2)SelectSESSION YEAR(step 3) and selectSESSION(step 4)then clickSEARCH ICON (step 4)
ALIST OF UNITSallocation will be displayed if available. -
To
Print Class Register/Attendance Sheetyou just select theunit(STEP 5 ) and ClickAtt. Sheet (STEP 6)and an attendance sheet will be downloaded. -
Again To
Print CAT sheet/CAT Attendance SHEETyou just select theunit(STEP 5 ) and ClickCAT sheet (STEP 7)and an CAT sheet will be downloaded.
Click on the image below to magnify
Class Register
The Screen below shows a Lecturer's Units Loads/Allocation
-
Click on
My Work Bench(STEP 1)thenUnits Loads (step 2)SelectSESSION YEAR(step 3) and selectSESSION(step 4)then clickSEARCH ICON (step 4)
ALIST OF UNITSallocation will be displayed if available. -
To
Print Class Register/Attendance Sheetyou just select theunit(STEP 5 ) and ClickAtt. Sheet (STEP 6)and an attendance sheet will be downloaded.
Click on the image below to magnify
Marks Capturing
The image below illustrate on students marks steps
-
STEP 1: Click onMy work load
-
STEP 2: On the top menu, click onExaminationsbutton. -
STEP 3: Click OnExam marksjust below the topmost menu. -
STEP 4: Click Onsession marksbutton on right handside,Once you have clicked onsession marksas shown below.Figure 1;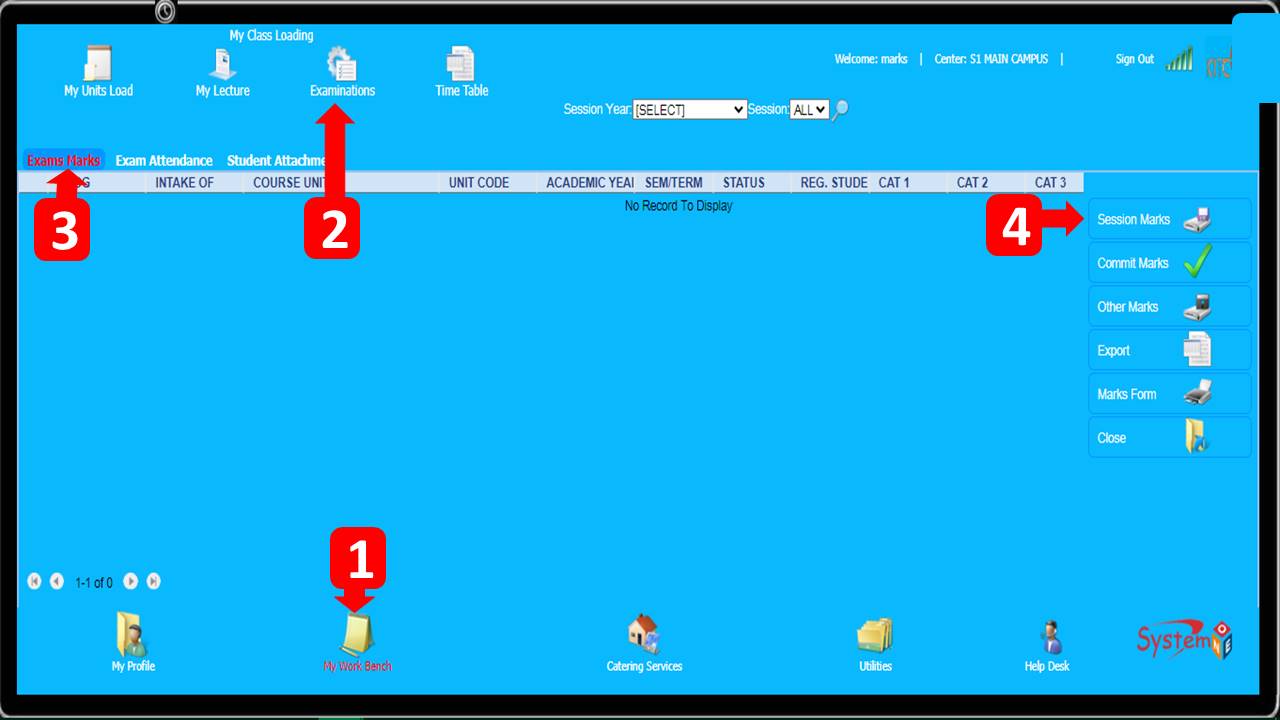
-
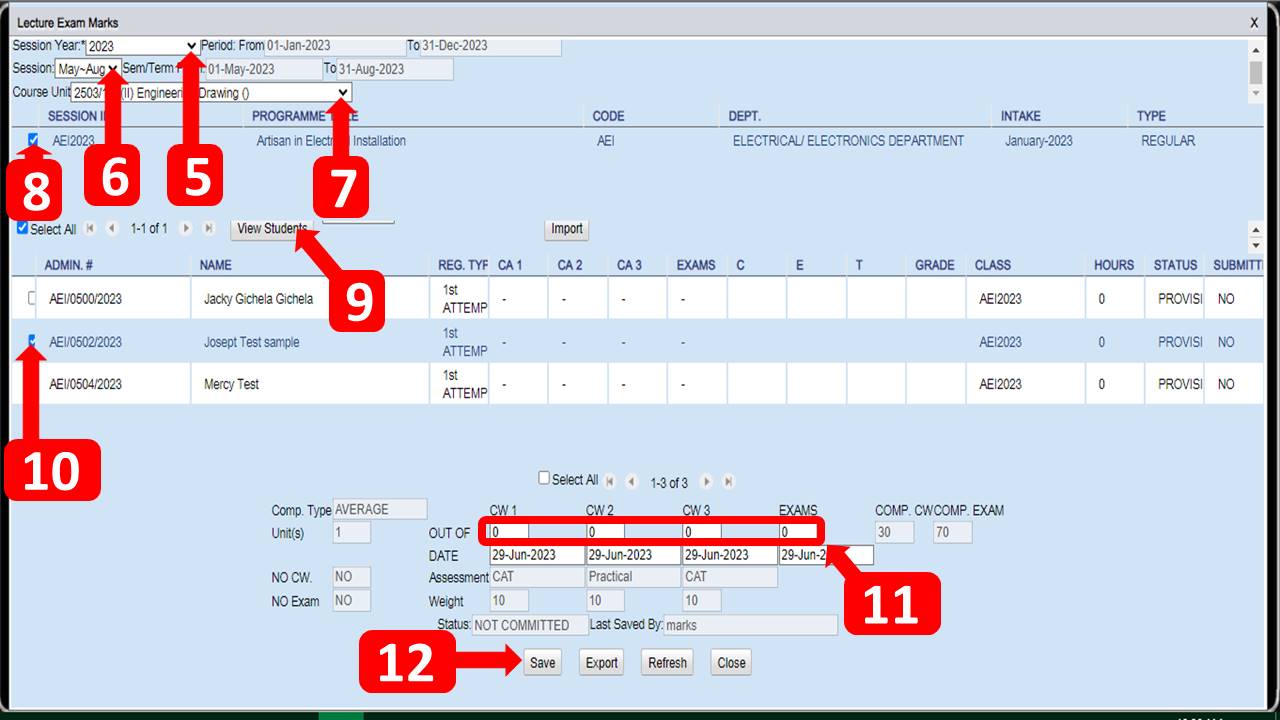
STEP 5: Select theSession Year. -
STEP 6: Select theSession Period. -
STEP 7: Select theCoure Unit. -
STEP 8: Once the Unit has been Selected,the class in which the unit is attached to will appear. Select the checkbox just before the class name.. -
STEP 9: Click OnView Studentsbutton for students to be displayed. -
STEP 10: Set theOut OfforCW1,CW2,CW3andEXAMS. -
STEP 11: Select the student then capture the marks,whereCA1is cat 1,CA2cat 2,CA3cat 3 andExamsfor Main Exam -
STEP 12: Click OnSavebutton to save the marks entered.
Figure 2;
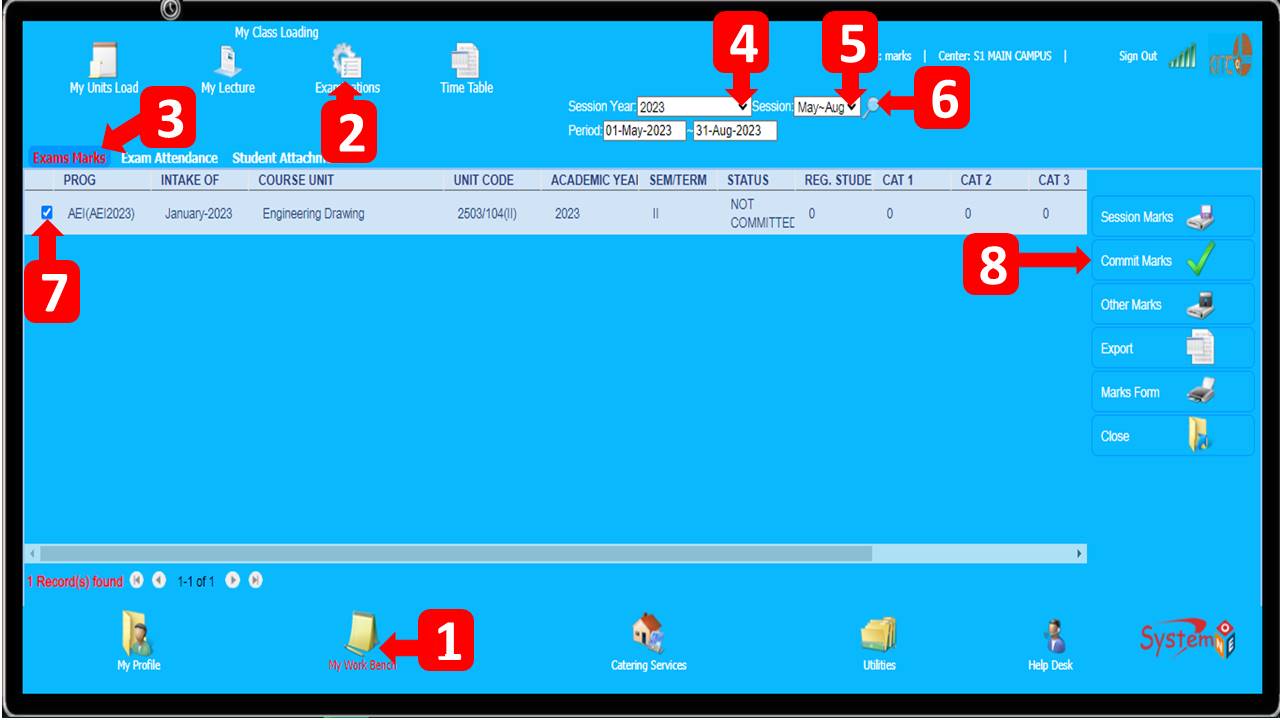
Committing Marks
-
STEP 1: Click onMy work load
-
STEP 2: On the top menu, click onExaminationsbutton. -
STEP 3: Click OnExam marksjust below the topmost menu. -
STEP 4: Select theSession Year. -
STEP 5: Select theSession period. -
STEP 6: Click onsearchbutton. -
STEP 7: Select the unit commit. -
STEP 8:Click onCommit marksbutton.
Capture student Attendance
Comming Soon
Print Captured Marks
Comming Soon
Capture Attachment/TP Markss
Tp Marks Capturing
The image below illustrate on students Tp/Attachment marks steps
-
STEP 1: Click onMy work load
-
STEP 2: On the top menu, click onAttachmentbutton. -
STEP 3:Select Attachment Period -
STEP 4Select the student and Click OnAssessbutton on right handside as shown below.Figure 1;