Procurement Module
The Procurement Module consists of the following Sub-modules: Some of the Sub-modules have several functionalities as illustrated below
Requisition Record(s)
Order(s)
Quotation(s)
Tender(s)
Purchase Grouping(s)
Record(s)
Invoice(s)
Payment Voucher
Requisition Record(s)
Follow these Steps to generate Requisition Record(s)
-
Follow
Step 1, 2 & 4to generate all requisition records (Skip Step 3) -
To generate specific requisition record(s), follow all the Steps shown below. Specify the
Search Byfilter and enter theSearch Valueas shown inStep 3
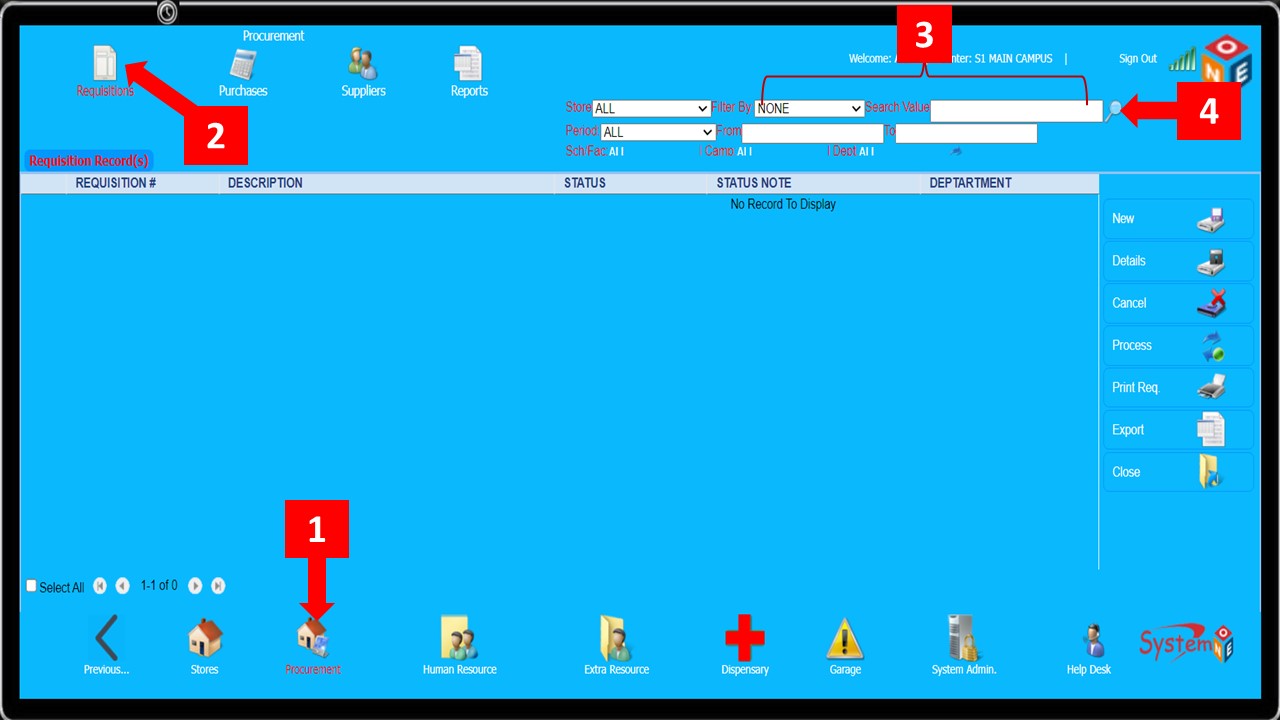
- The list generated below shows all the requisition records

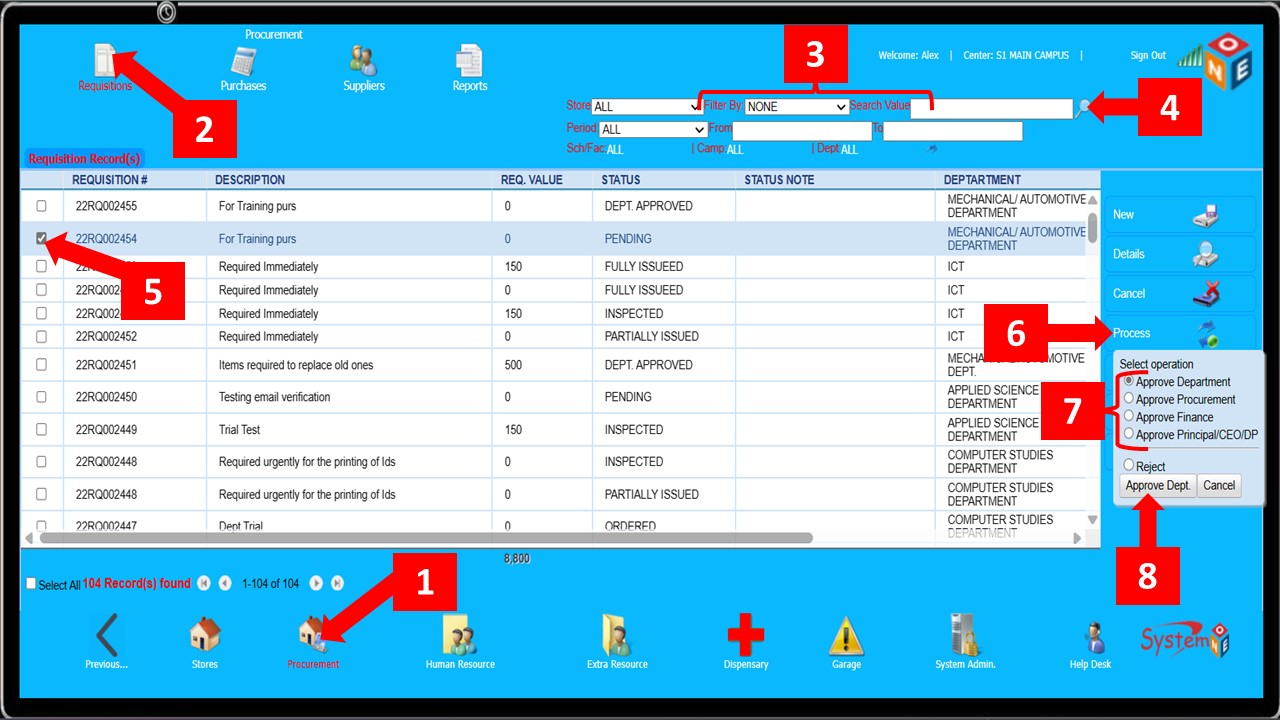
Follow these Steps to Approve Requisition(s)
-
For you to Approve a Requisition, you must be authorized to perform the operation on the record source department
-
Steps 1 & 2lead you to Requisition Record(s) -
Specify the search criteria, enter the search value (
Step 3) and click the magnifying lens (Step 4) to display the Requisition(s) -
Skip
Step 3to display all Requisition Record(s) -
Select the requisition record to be Approved (
Step 5), click Process (Step 6) -
Select Approve Department/Procurement/Finance/Principal (
Step 7), and click the Approve button shown in (Step 8) -
The approval must be done in the order illustrated in
Step 7
-
Click
OKas shown inStep 9below to proceed to the next step

-
Click
OKas indicated inStep 10below, and the procurement status changes to Dept/Proc/Fin/Princ. Approved depending on the office the approval is coming from

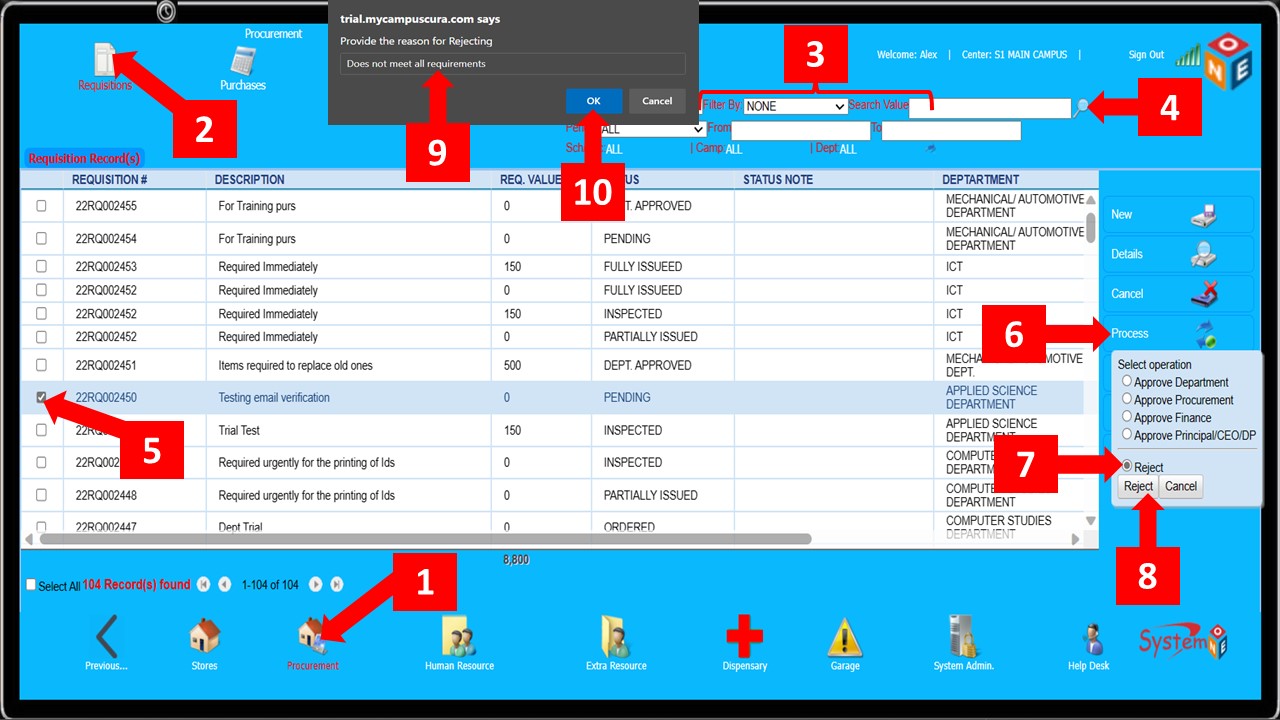
Follow these Steps to Reject Requisition(s)
-
For you to Reject a Requisition, you must be authorized to perform the operation on the record source department
You can only Reject Requisition(s) which has NOT been Approved by the Principal
-
Steps 1 & 2lead you to Requisition Record(s) -
Specify the search criteria, enter the search value (
Step 3) and click the magnifying lens (Step 4) to display the Requisition(s) -
Skip
Step 3to display all requisition records -
Select the requisition record to be rejected (
Step 5), click Process (Step 6), select Reject (Step 7), and click the Reject button shown in (Step 8) -
On the text box that appears, provide the reason for rejecting (
Step 9), and clickOKas shown inStep 10
Order(s) (LPO/LSO)
Before an order can be made, a requisition must have been made and approved by all the relevant offices To make an order, follow the steps below
-
Steps 1, 2 & 3shown below will lead you to the order form

-
On the order form, select the Supplier as shown below in
Step 4. This leads you to theSearch Customerform, where you search and select the supplier -
After selecting the Supplier, set the order type i.e if it’s an LPO or LSO (
Step 5) -
Type in the Order Description (
Step 6) -
Click the magnifying lens shown in
Step 7to search for and select the vote head the expenditure is from -
Click the
Select from Requisition(s)button as shown inStep 8 -
That leads you to the
Search Store Requisitionwindow from which you search for and select the approved requisition that you are about to use to place an order

-
On the
Search Store Requisitionwindow, specify the Search By criteria, enter the Search Value, and click the magnifying glass to display the requisition record as shown inStep 9 & 10 -
Select the (
Select All) checkbox shown inStep 11to highlight all the items -
Click the
Usebutton shown inStep 12. This leads you back to theOrder Form

-
The items should now be displayed on the
Order Formas shown below -
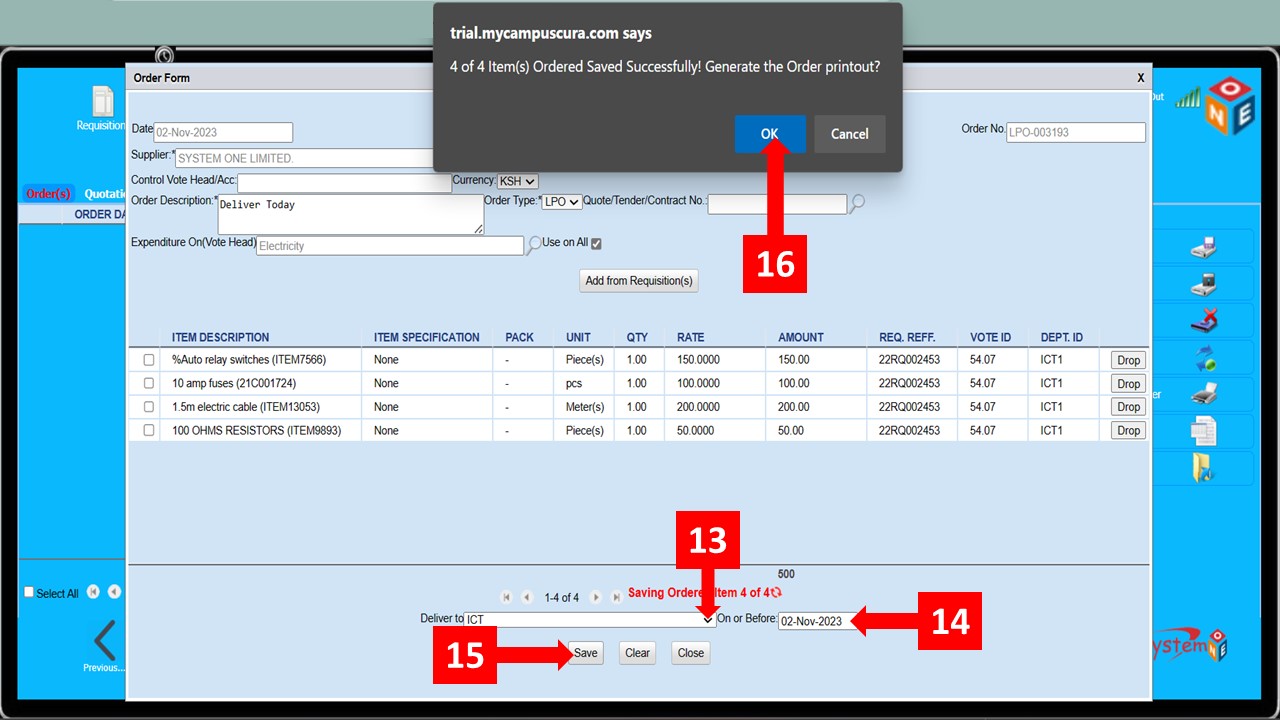
If the rates are not set in the system enter them in the
Ratecolumn. The system will block you from proceeding if the rates are set to Zero (0.0000) -
Select the department to which the items are to be delivered as shown in
Step 13 -
Set the Expected Delivery Date and click Save as shown in
Step 14 & 15respectively -
Click OK on the Dialog Box that pops up as shown in
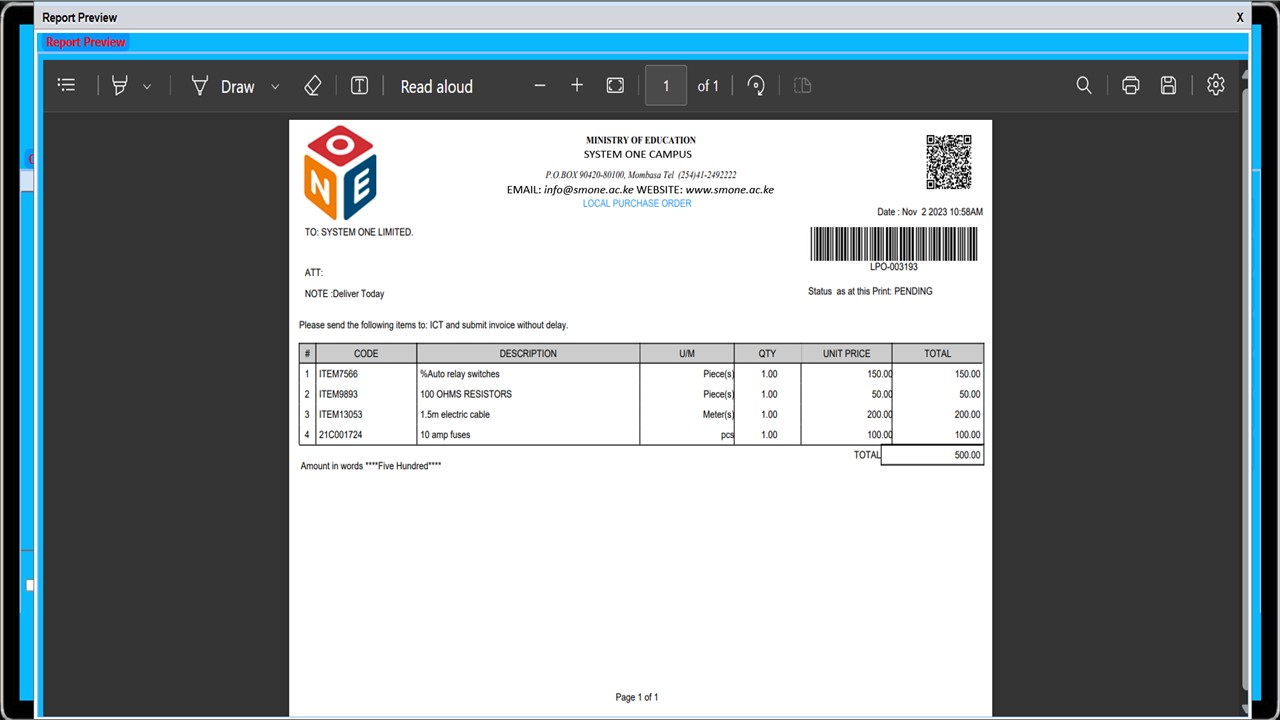
Step 16 - A report preview window with the LPO/LSO will appear
- The figure below shows a preview of an LPO/LSO
- You can print or save the document from the top right corner of the report preview window
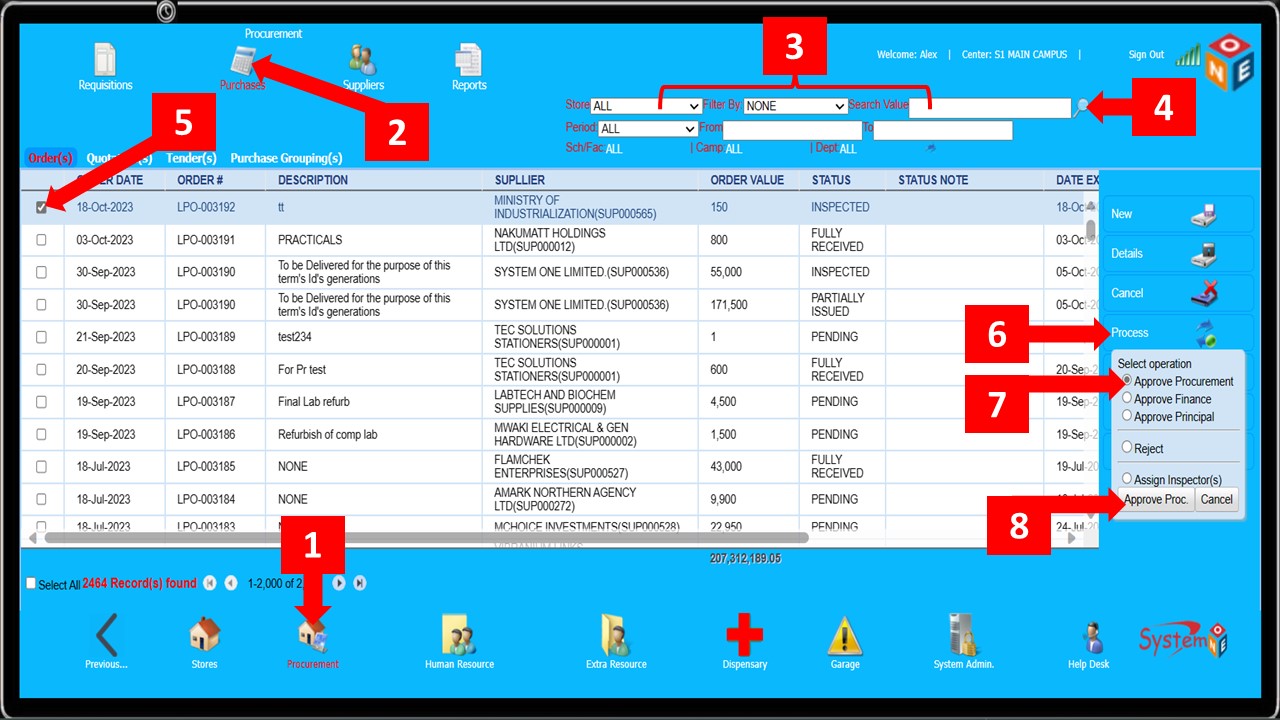
- The steps below show how to approve an order (LPO)
- Typically, the approval is done in three different stages. Procurement Office, Finance Office, and Principal’s Office
- The approval must be done in the order shown above, from the lowest to the highest office
-
Follow
Step 1 & 2to get to Order(s) -
Specify the Search Criteria and enter the Search Value as shown in
Step 3to search for a specific LPO -
Click the magnifying lens in
Step 4to display the LPO (Skip Step 3 to display all the available LPOs) -
Select the LPO you would like to approve (
Step 5) and click theProcessbutton shown inStep 6 -
Select the relevant office on the small menu that appears (
Step 7) and click theApprovebutton shown inStep 8
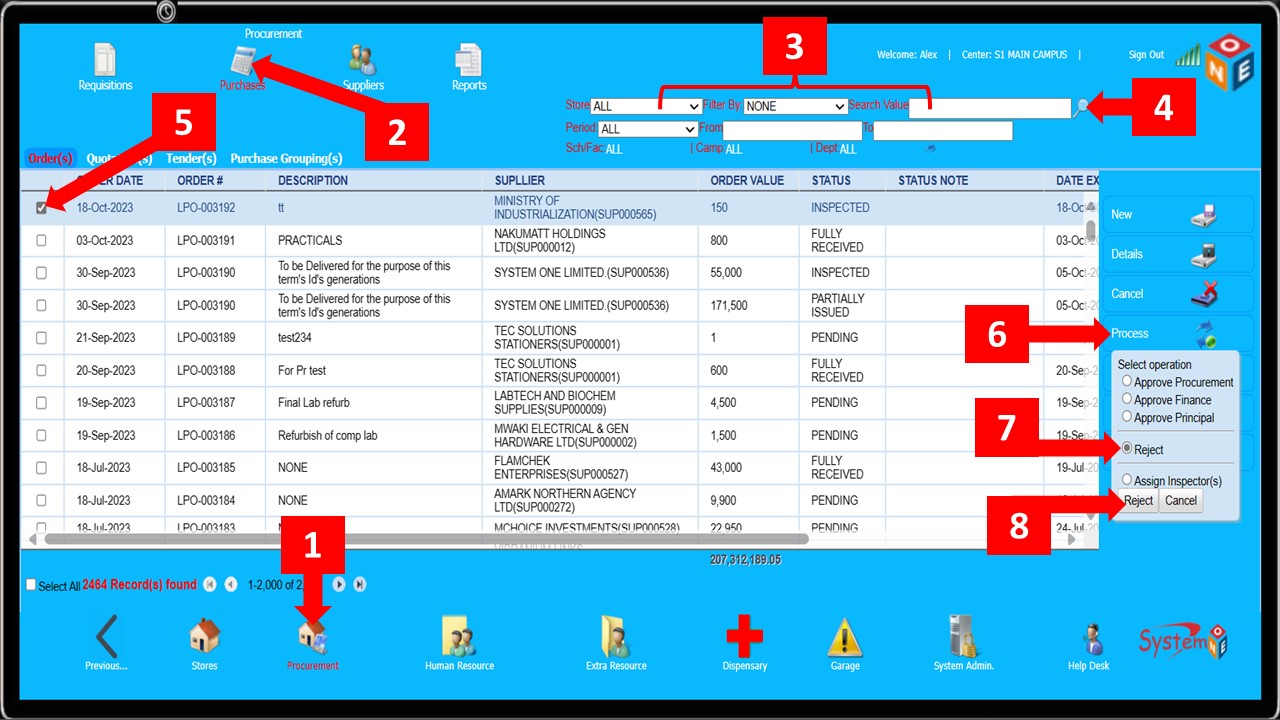
- If an LPO does not meet all the requirements, It can be rejected as shown below
-
Follow
Step 1 & 2to get to Order(s) -
Specify the Search Criteria and enter the Search Value as shown in
Step 3to search for a specific LPO -
Click the magnifying lens in
Step 4to display the LPO (Skip Step 3 to display all the available LPOs) -
Select the LPO you would like to reject (
Step 5) and click theProcessbutton shown inStep 6 -
Select
Rejecton the small menu that appears (Step 7) and click theRejectbutton shown inStep 8
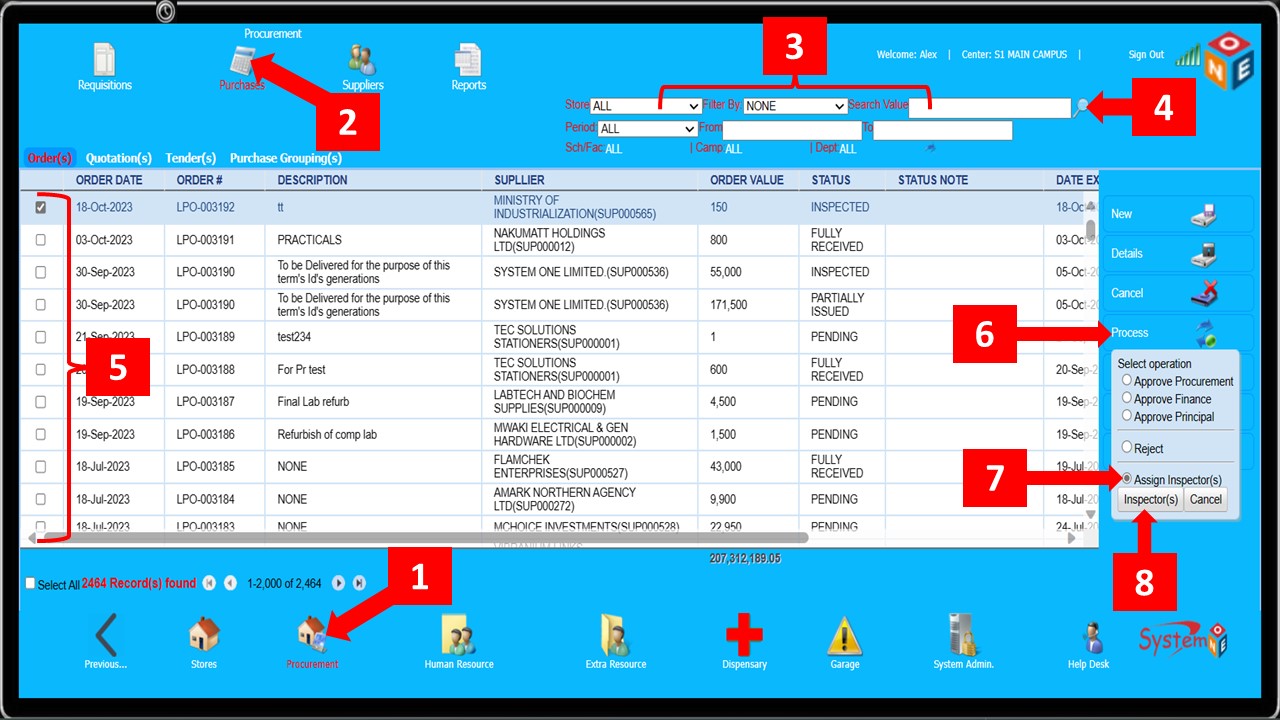
- After all the relevant offices have approved the LPO, the next step is to assign Inspector(s) (This step is not mandatory and can be skipped)
- The steps below guide you to assign inspector(s) for an order
- The inspector(s) will ensure that the items supplied are of the right quality and quantity and that any other specified conditions are met before the ordered items can be received
- Once inspector(s) have been assigned, the inspection must be done and updated on Campus Cura before the process can move to the next step
-
Follow
(Step 1 & 2)to get toorder(s) -
To search for a specific order, specify the search criteria and enter the search value as shown in
Step 3. You can also set thePeriodto filter the orders by a certain range of time -
Click the magnifying lens in
Step 4to display a list of the order(s), you can skipStep 3to display all the orders -
Select the relevant order as shown in
Step 5and click theProcessbutton shown inStep 6 -
On the small menu that appears, select the
Assign Inspector(s)option (Step 7) and click theInspector(s)button (Step 8)
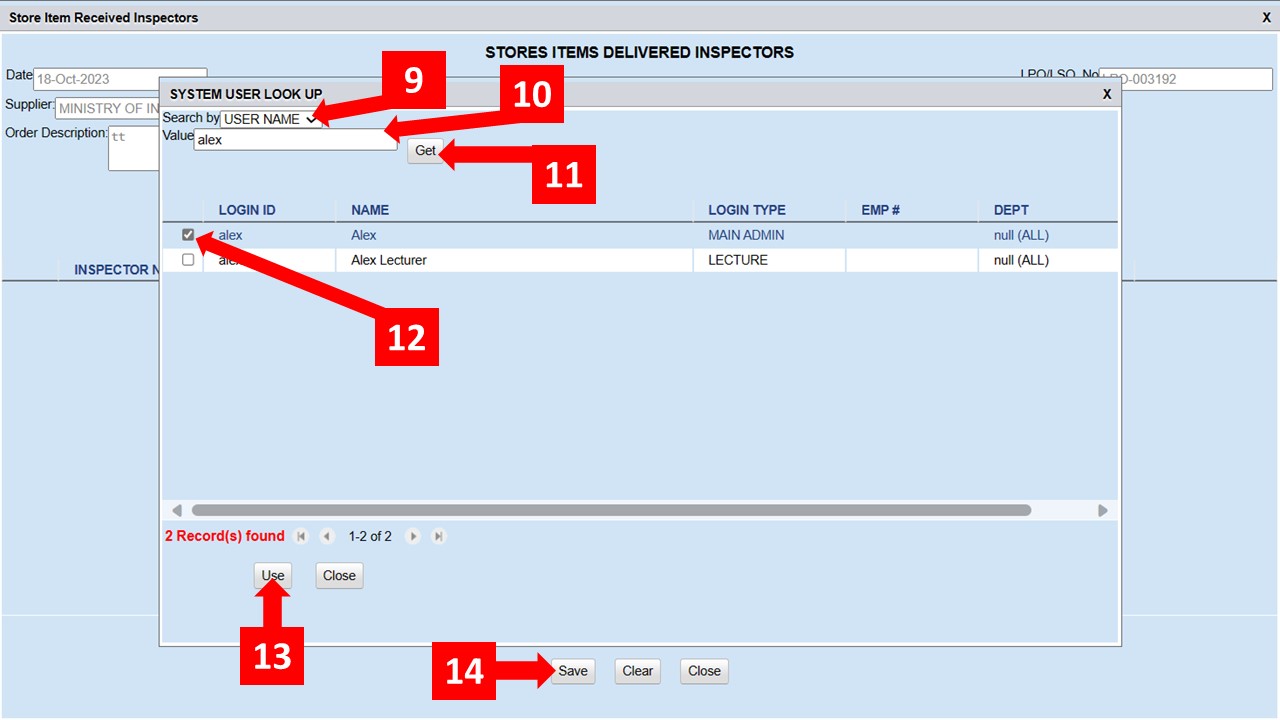
- The steps highlighted previously lead you to the window shown below, from which you select the Inspector(s)
-
Specify the
Search Bycriteria as shown inStep 9(or set it to None in order to display a list of all the users) -
Enter the
Search Value(Step 10) and click theGetbutton (Step 11) to display the user(s) -
Select the right one(s) (
Step 12) and click theUsebutton (Step 13) -
Click the
Savebutton (Step 14) on theStore Item Receivedwindow and the Inspector(s) will have been successfully assigned
- To print an LPO/LSO, follow the steps below
-
Follow (
Step 1 & 2) to get toorder(s) -
To search for a specific order, specify the search criteria and enter the search value as shown in
Step 3. You can also set thePeriodto filter the orders by a certain range of time -
Click the magnifying lens in
Step 4to display a list of the order(s), you can skipStep 3to display all the orders -
Select the relevant order as shown in
Step 5and click thePrint Orderbutton shown inStep 6 -
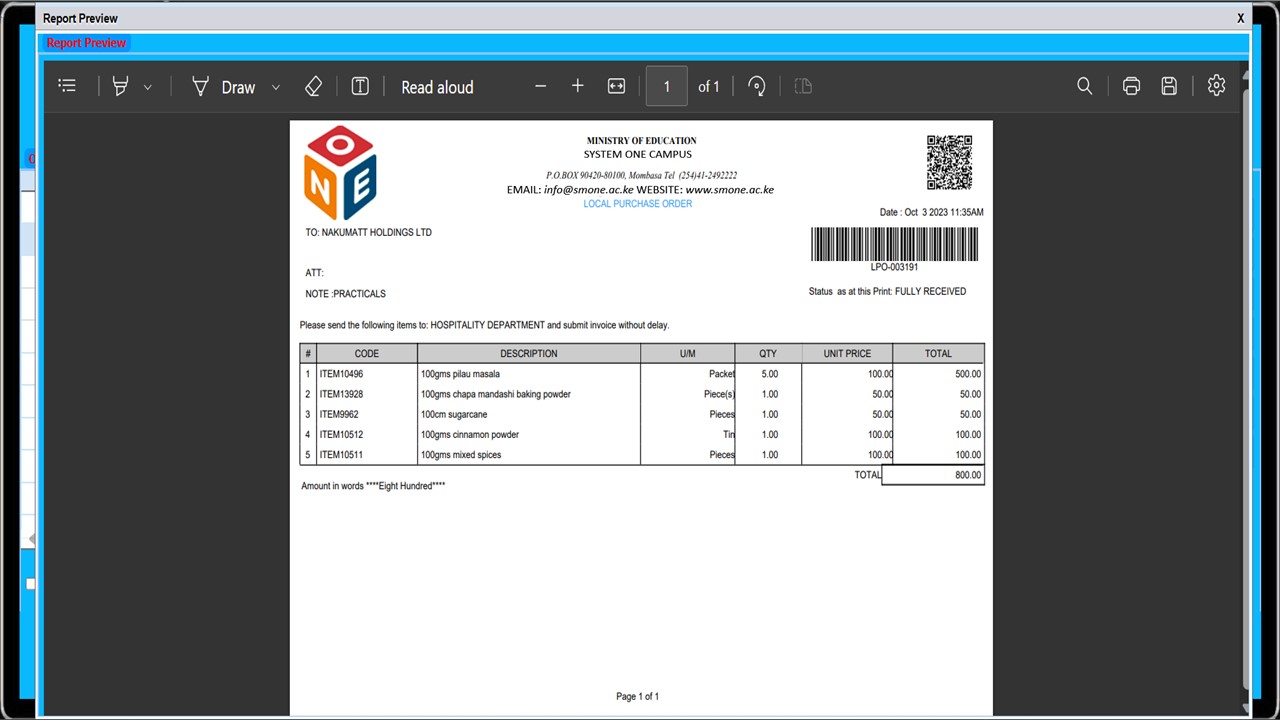
After
Step 6, aReport Previewwindow appears with a preview of theLocal Purchase Order/Local Service Order

- The figure below shows a preview of an LPO
- You can print or save the document from the top right corner of the report preview window
Quotation(s)
Comming Soon
Tender(s)
Comming Soon
Purchase Grouping(s)
Comming Soon
Record(s)
Follow the steps below to view existing supplier records, and amend or delete their details
-
Follow
Step 1 & 2to get to supplier records -
Specify the
Filter Bycriteria and enter theSearch Valueas shown inStep 3(Skip this step if you would like a list of all the supplier records) -
Click the magnifying lens (
Step 4) to display the entries -
In order to amend or delete any record, select the relevant entry as shown in
Step 5and choose whether to amend or delete the record (Step 6)

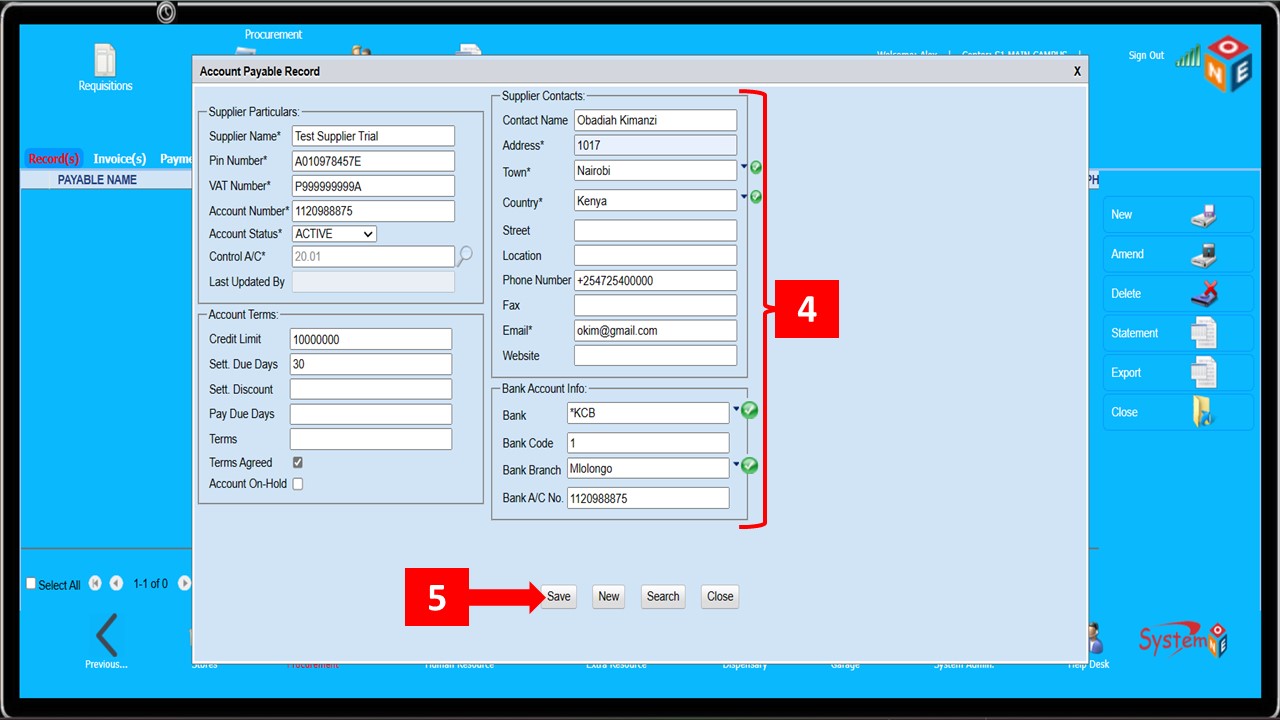
- Follow the steps below to add a new supplier
-
Steps 1 – 3will lead you to theAccount Payable Recordwindow where you will key in the supplier details

-
The
Account Payable Recordwindow is as shown below -
Enter the supplier’s details as shown below
Step 4and click theSavebutton (Step 5)
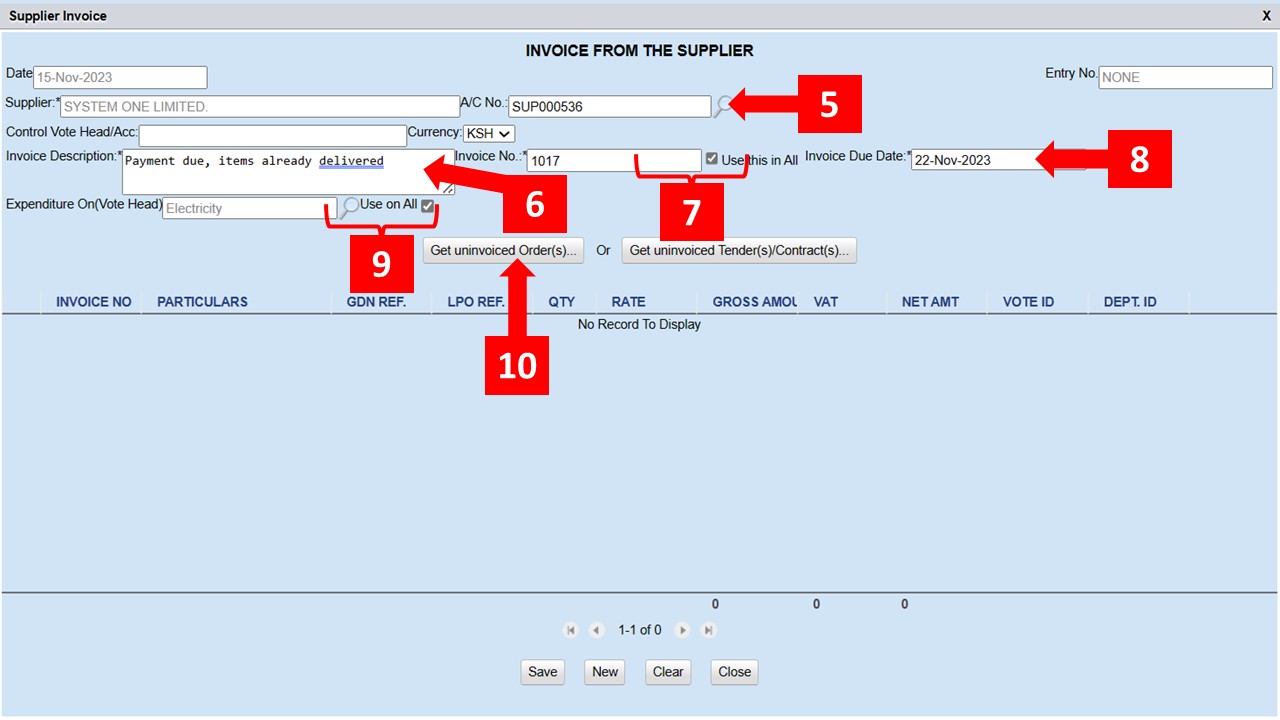
Invoice(s)
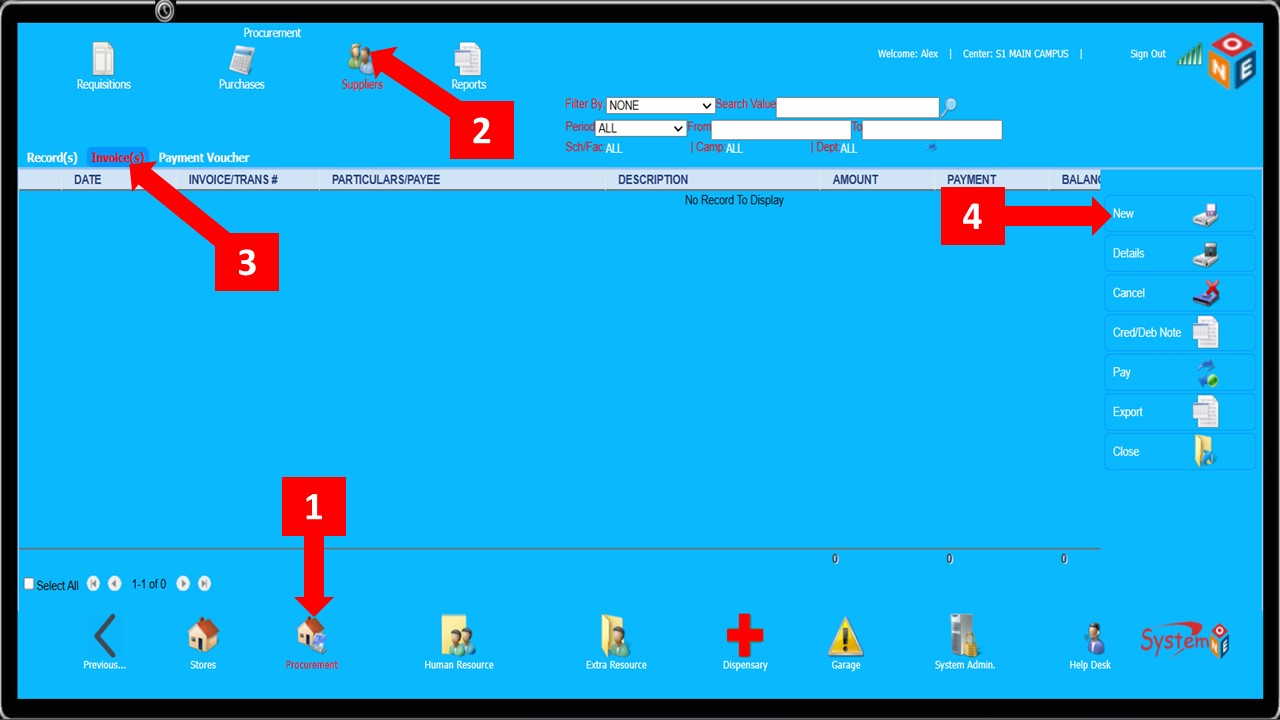
Follow the steps below to create and process Invoice(s)
-
Follow
Steps 1 – 3to get toInvoice(s) -
Click the
Newbutton indicated inStep 4to create an Invoice
-
Click the magnifying lens shown in
Step 5to search and select the supplier the invoice is from -
Enter the invoice description as shown in
Step 6. You can skip this for the description to be inherited from LPO -
Enter the Invoice number and check the box as shown in
Step 7and set the due date (Step 8) -
Click the magnifying lens shown in
Step 9to search and select the vote heads, and select theGet Uninvoiced Ordersbutton (Step 10)
-
Specify the Search Criteria and enter the Search Value as shown in
Step 11then click the magnifying lens (Step 12) to display a list of orders from the supplier you selected earlier - Click the checkbox before the magnifying lens to display undelivered orders only
-
Select the order you’re receiving the invoice for (
Step 13) and click theUsebutton shown inStep 14
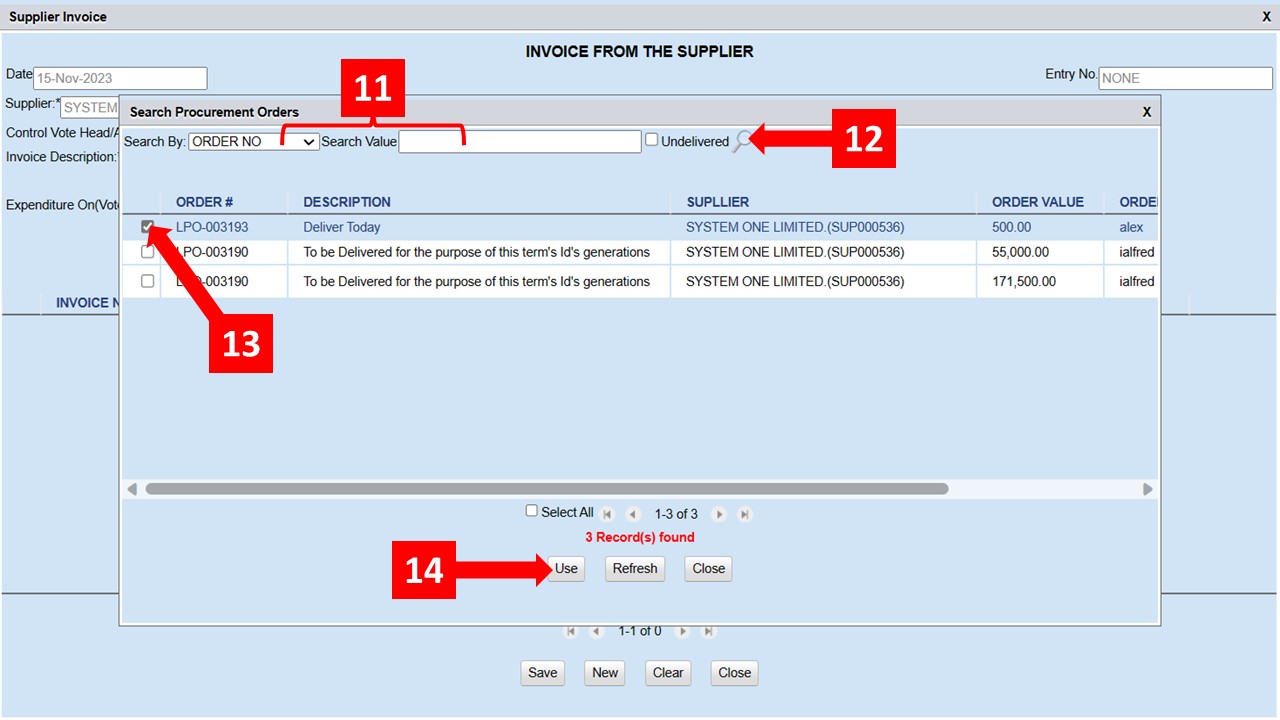
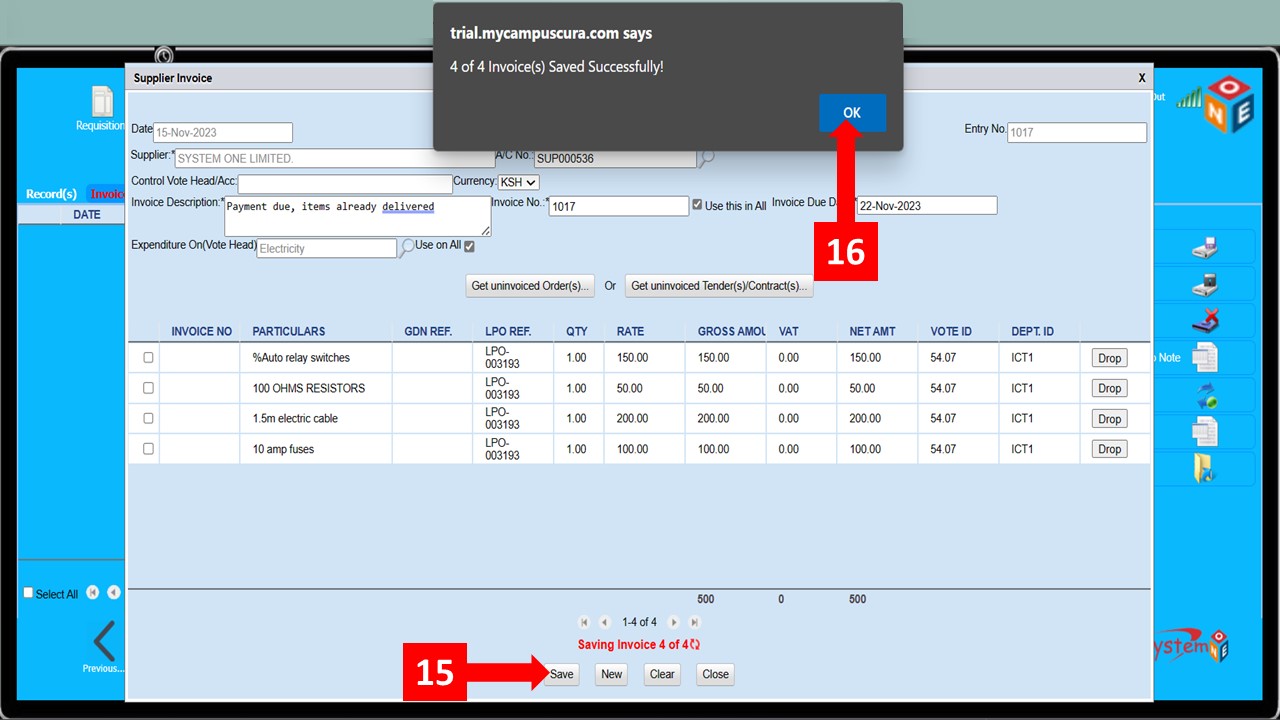
- All the items in the LPO should now appear on the supplier invoice window
-
Click
Save(Step 15) and clickOkon the text box that appears -
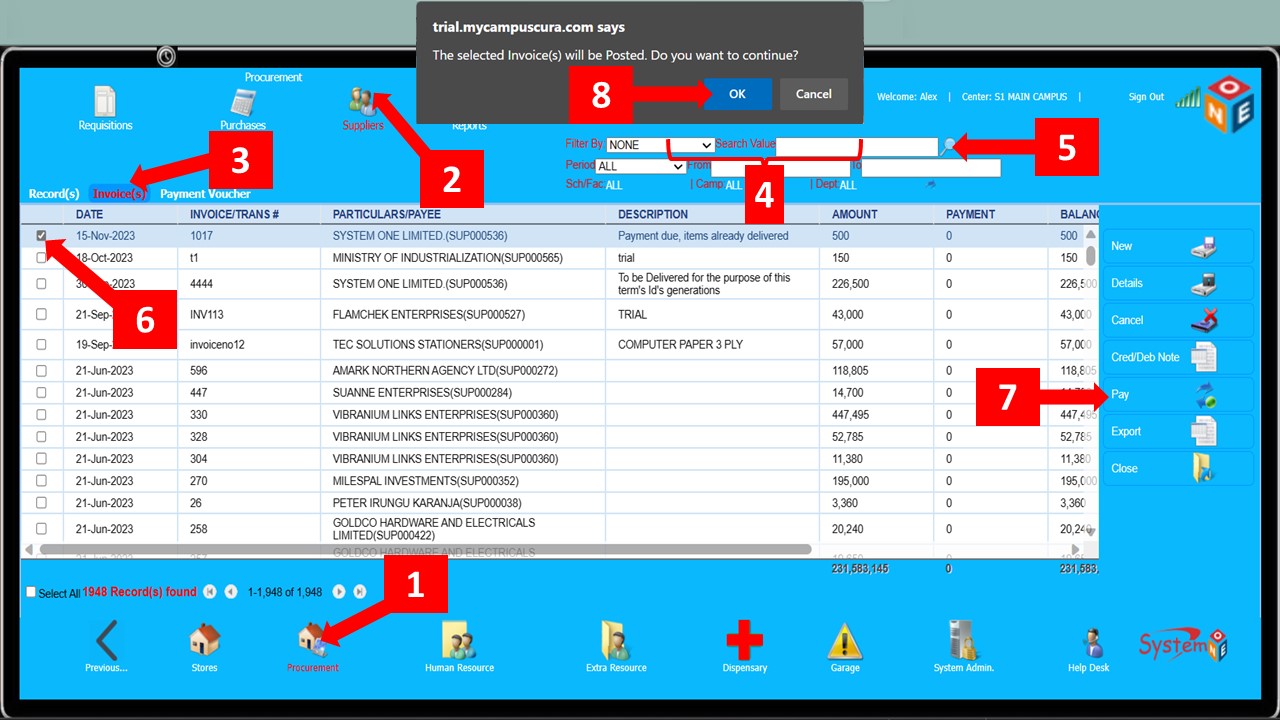
Follow
Steps 1 – 3to get to invoices
- After the invoice has been received, it should be posted before a Payment Voucher can be prepared
- Follow the steps below to post an invoice
-
Follow
Steps 1 – 3to get toInvoice(s) -
Specify the Search Criteria and enter the Search Value as shown in
Step 4then click the magnifying lens (Step 5) to display a list of invoices -
Select the invoice you would like to post (
Step 6) and click thePaybutton shown inStep 7 -
Click
Okon the text box that appears (Step 8) -
Should you encounter any challenges trying to post an Invoice, the process can be done from the
Finance Module
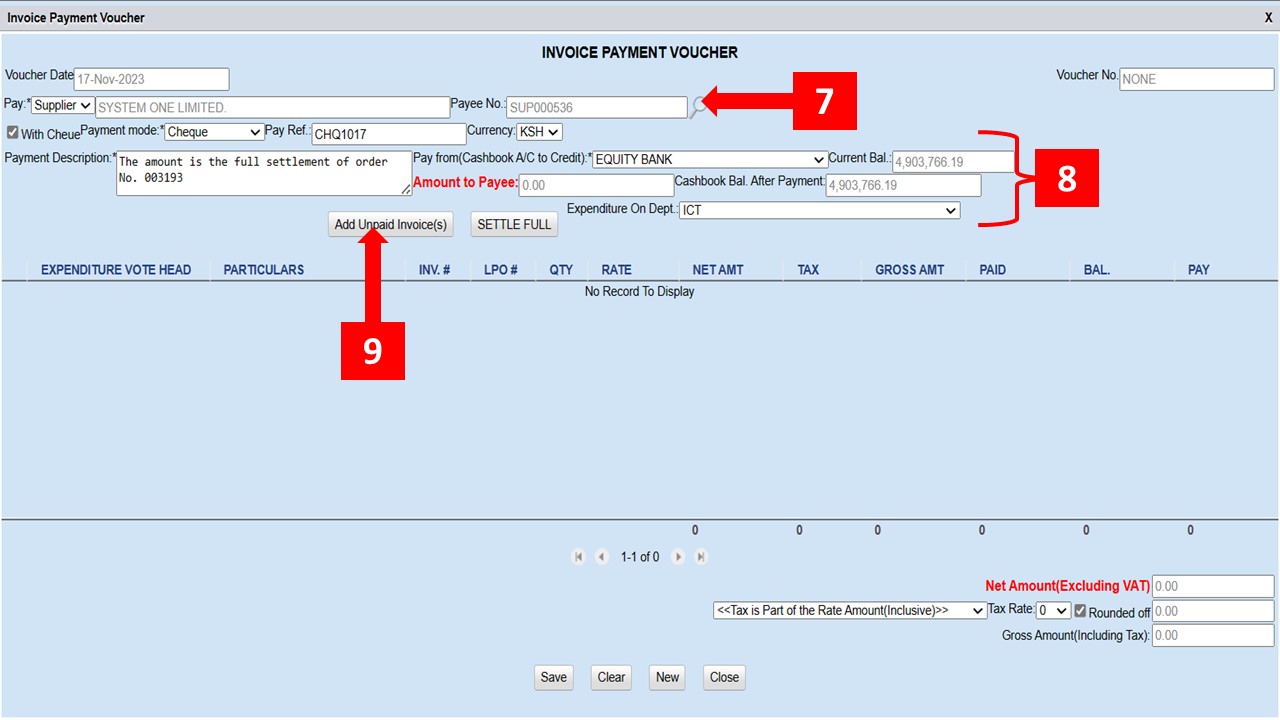
Payment Voucher
Follow the steps below to create and process Payment Voucher(s)
-
Follow
Steps 1 – 3to get to Payment Vouchers -
Click the
Newbutton shown inStep 4 -
On the small menu that appears, select
Invoiced Payment(Step 5) and click theInvoicedbutton shown inStep 6

-
Search and select the supplier as shown in
Step 7 -
Enter the details such as payment mode, reference, description, account to be credited, and the department
from which the expenditure is to be charged as shown in
Step 8 -
Click the
Add Unpaid Invoice(s)button as shown inStep 9
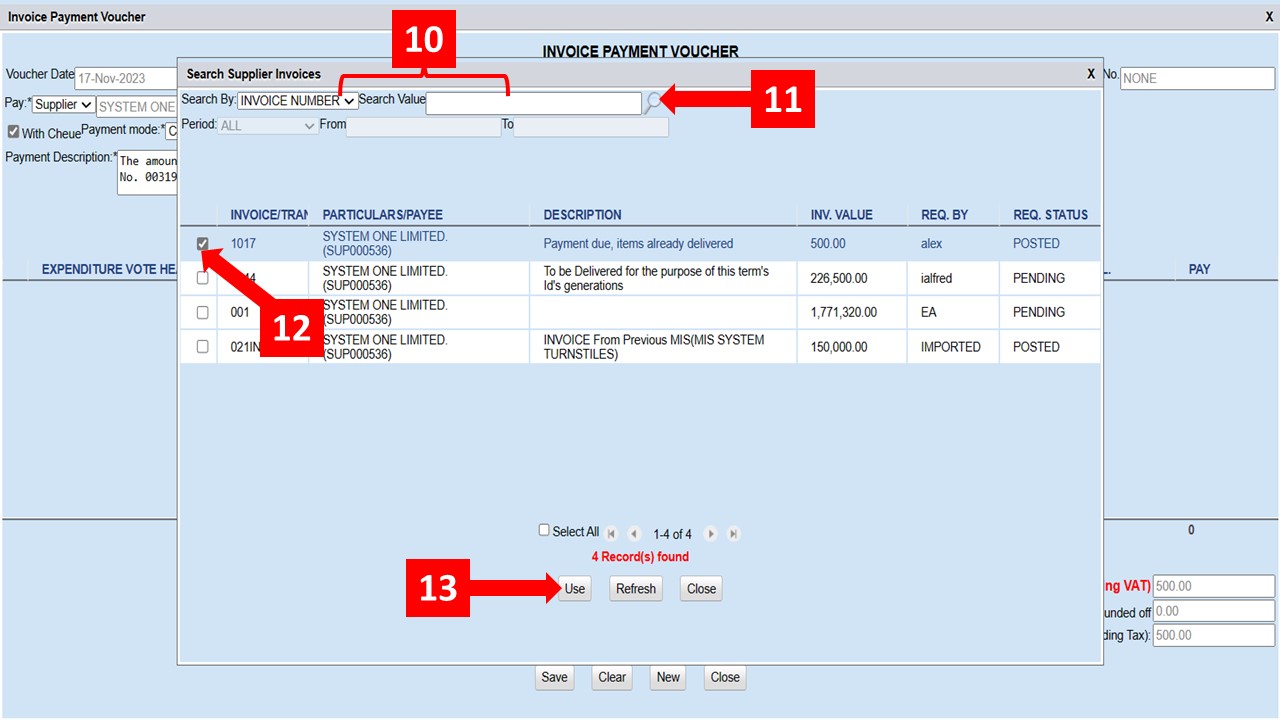
-
On the window shown below, specify the search criteria, enter the search value (
Step 10), and click the magnifying lens shown inStep 11to display the Invoice(s) -
You can skip
Step 10and proceed toStep 11to display a list of all the Invoices -
Select the Invoice as shown in
Step 12and click theUsebutton shown inStep 13 -
NOTE: For this to be successful, theRequisition Statuson the right hand side should read POSTED
-
The items and details should now appear on the
Invoice Payment Voucherwindow as shown below -
Select whether the tax is inclusive or exclusive and set the tax rate as shown in
Step 14 -
Click the
Settle Fullbutton as shown inStep 15to offset the whole amount -
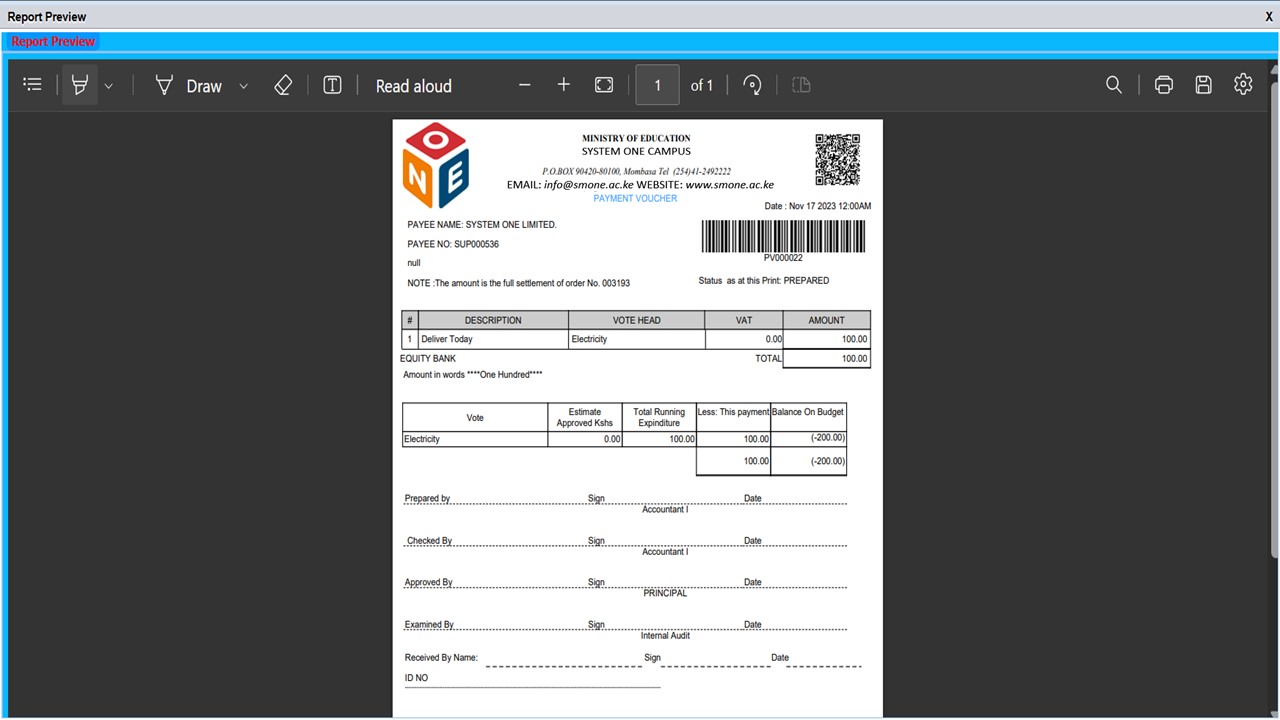
Click
Save(Step 16) and clickOKon the text box that appears as shown inStep 17

- The figure below is the representation of a Payment Voucher
Reports
Comming Soon