Programme
All Things about a programme/Course happens here.Creating new Programmes,Attaching units and setting auto Grading for Examination
Creting New Programme
on the Main Menu Click on Programmes(STEP 1) as shown below.
Then Click Programme Info (STEP 2) top left corner as shown below.
To The Right Side, Click New (STEP 3) as shown below.

on the Pop Up Form fill all the required details as per your institution
requirements as shown below with an example
Then Click SAVE

Attaching Units to a New Programme
After Creating New Programme as shown below Click on Syllabus(STEP 1) as shown below

To Add/Attach new Unit click on Add (STEP 1) as shown below.
A pop up form will appear Click on Step 1 to see the form and continue as shown on the pop up
form.

Amend Programme
-
on the Programmesset the following features to enable auto grading
-
on the Programmes details FormClick on Syllabus toNavigateto Syllabus Form
-
Set Year/stage,semester/term,maximum hours and hours per weekfor a unit or units.-
Enter
MAX HOURS PER TERMonMAX HRSColumn and -
HOURS PER WEEKonHRS/WKColumn and -
the year when the unit will be doneonYEAR/STAGE/MODULEColumn and -
Semester or Term when the unit will be doneonSEM/TERMColumn as shown below

-
-
on the Programmes details FormSet other features as shown below-
# UNITS: number of equivalent units -
NO CW:Course work. Default settingsNOWhich means course work available. -
NO EX: End of Term/Semester Exams. Default settingsNOWhich means End Of Term/Semester Exams is available. -
CW OUT OF: If you setNO CWtoNOthen YouMUSTCW OUT OF. -
EX OUT OF: If you setNO EXtoNOthen YouMUSTExams out of

-
-
Set Exams OUT OFas shown below-
CW COMP TYPE: Course Work Computation Type .Default settingsAVERAGEMeaning the CW1,CW2 and CW3 will beAVERAGED
OtherCW COMP TYPE: isWEIGHTEDMeaning the CW1,CW2 and CW3 carry some weight -
CW1 ASSESSMENT TYPE:Default settingsAssignment
You can select other ASSESSMENT TPYES likeCAT or Practical

-
-
Units Combining Screen- click on
Step 1and a pop up form will appear to Help you select A unit to combine with On Step 2Enter theRATIObetween 0 and 1On Step 3Enter theNew Unit NameandNew Unit Code
Note :New Unit NameandNew Unit Codemust also be Course Units poolthen Combineas shown below


Course units
Comming Soon
Course_new
Comming Soon
Course_amend
Comming Soon
Intake/Class
NOTE:
Creating Intakes will Automaticlly open Applicant's Portal and students will be able to apply
All intakes Caldender
needs to fit in
TERM 1 START DATE AND END DATE
TERM 2 START DATE AND END DATE
TERM 3 START DATE AND END DATE
 Academic Session
                        Calender
Correctly.
New Intake
on the Main Menu Click on Programmes(STEP 1) as shown below.
Then Click Intake(STEP 2) as shown below.
To The Right Side, Click New (STEP 3) as shown below.

on the Pop Up form select Department (STEP 1 ) as shown below.
Then Programme Title* (STEP 2) as shown below.
Class Code*(STEP 3) Can be Generated Automaticlly or You can UNCHECK and Enter
the Class Code as shown below.
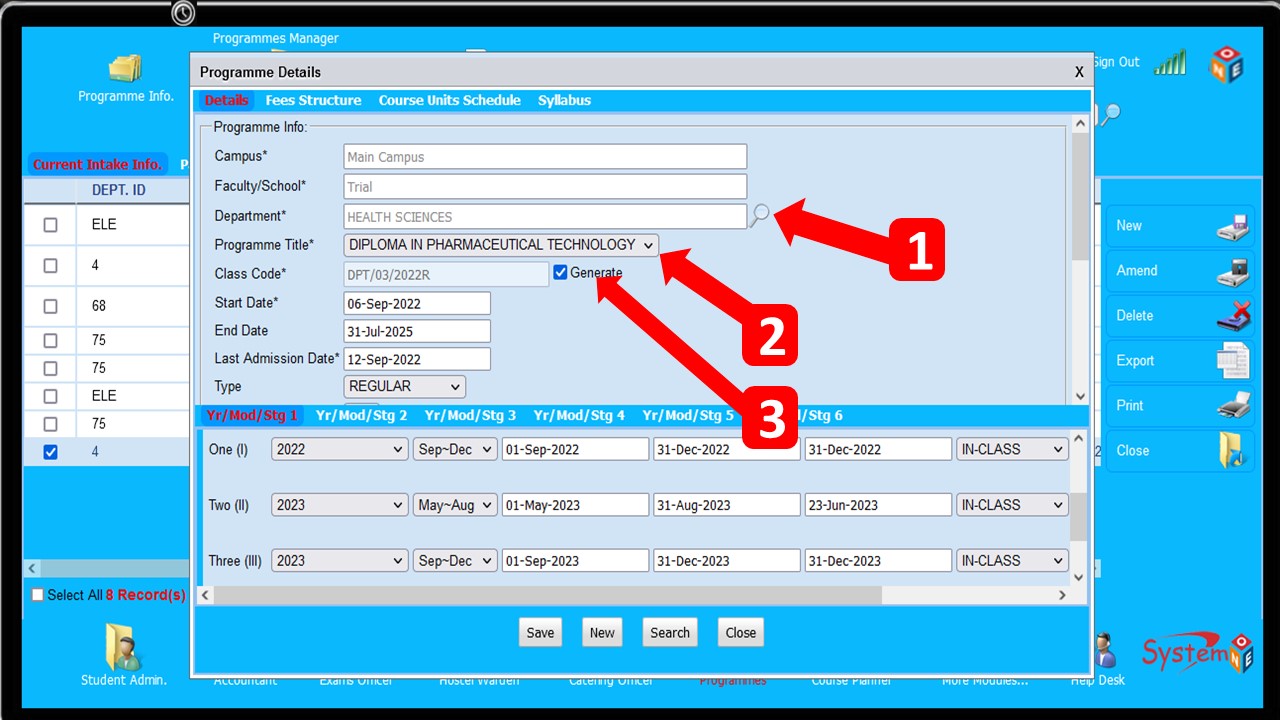
Enter Start Date* Start date of the class
Enter End Date*End date of the class
Last Admission Date* After the date indicated here the students will be admitted.
Type Default to REGULAR. We also have PART-TIME AND SCHOOL-BASED.Other can be added if need be.
Click SAVE
Select Duration Period
Select Attendance ModeFor example
FULLTIME,
EVENING,
HOLIDAY ONLY,
WEEKENDS ONLY Or
DISTANCE LEARNING

Admission/Registration Policy
Enter Application Deadline*
Select Admission Letter Source* If you have 2 or more Admission Letters then Select Select the
One to be used.
Select Source of Unit Reg.Default SYLLABUS
Select Units Registered by. Default PREDEFINED
Check/uncheck Application Fees a Must


Intakes_amend
Comming Soon