Stores Module
The Stores Module consists of the following Sub-modules: Some of the Sub-modules have several functionalities as illustrated below
Requisition(s)
Item Receipt(s)
Item Issue(s)
Item Inventory
Inventory Classification
Order(s)
Quotation(s)
Tender(s)
Purchase Grouping(s)
Requisition(s)
The following steps guide you on how to do Requisition
-
Follow
Steps 1-3to create a new requisition
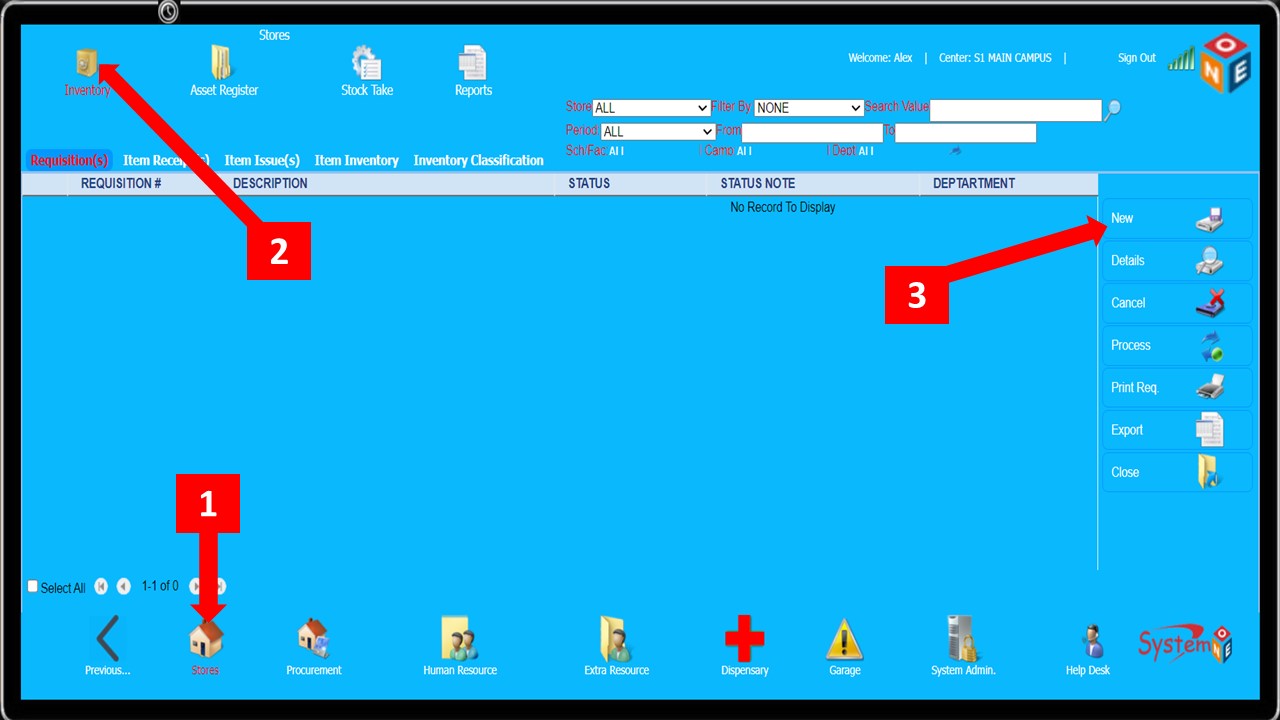
-
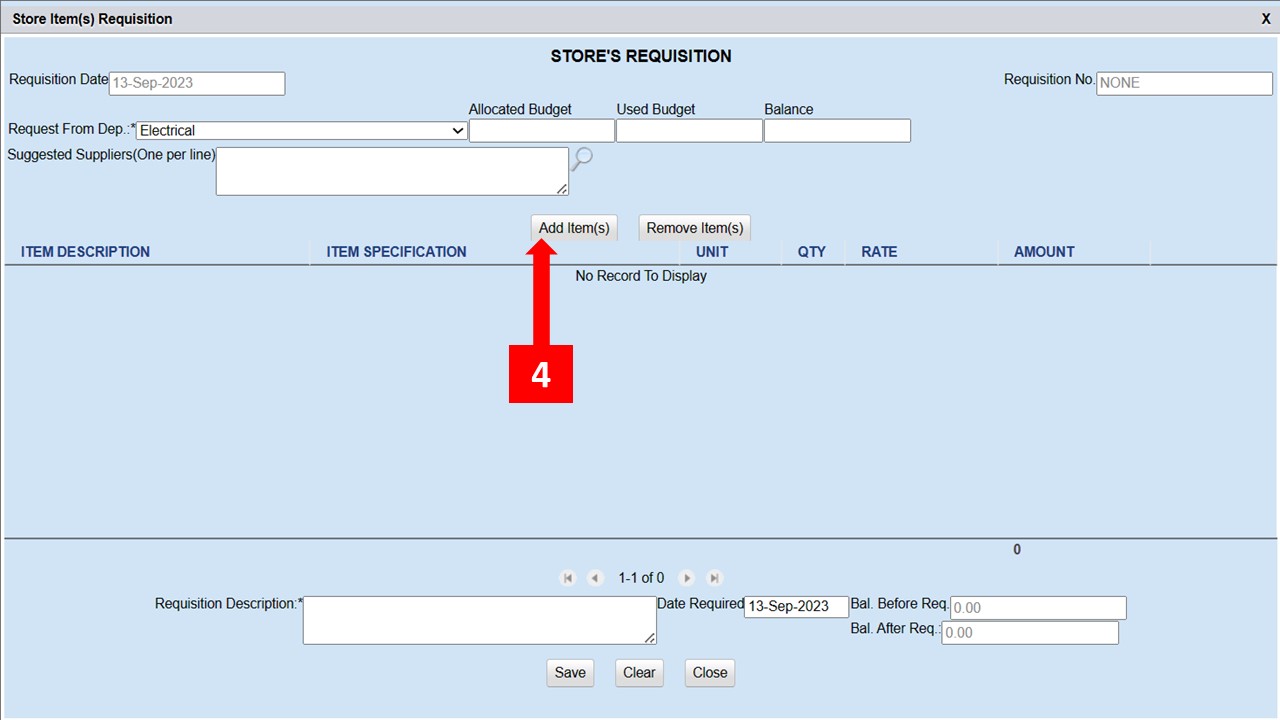
Click the
Add Item(s)button as shown inStep 4 -
This leads you to the
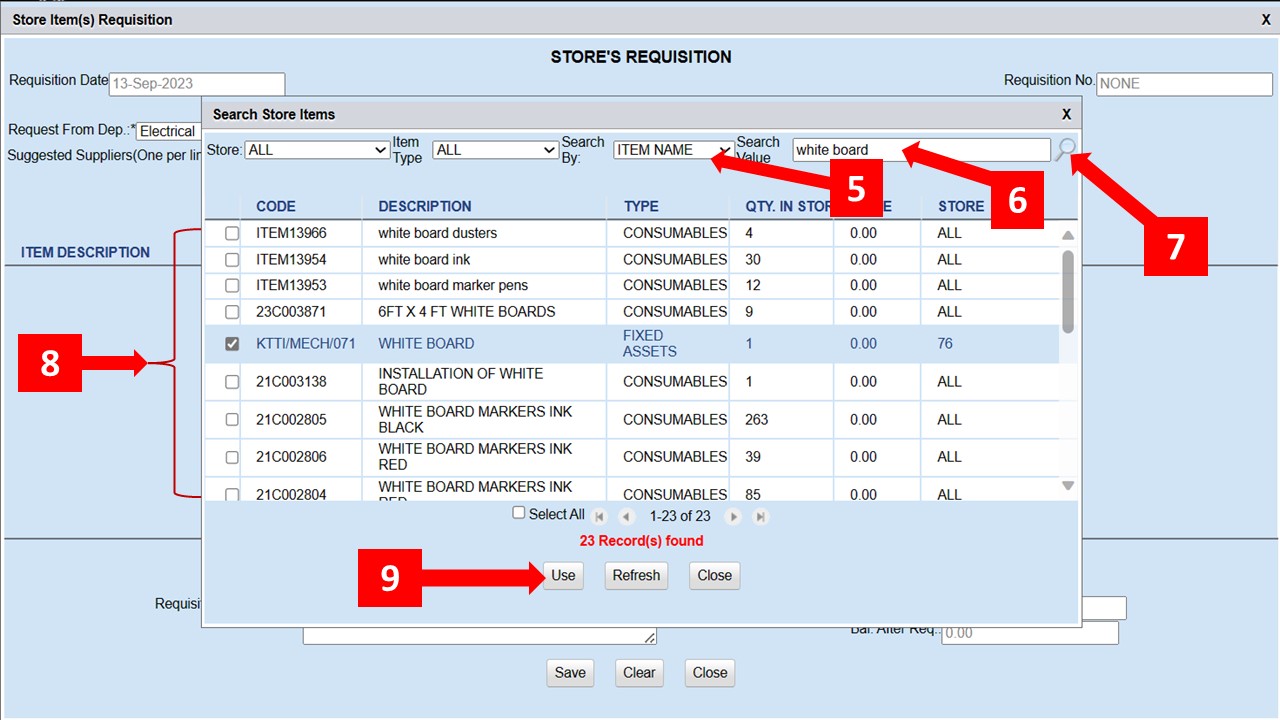
Store Itemswindow from which you can narrow down your search to whatever item(s) you want from the several available search filters
-
Specify the
Search byfilter as shown inStep 5and enter theSearch valueStep 6 -
Click the magnifying lens in
Step 7to search for the item from the inventory -
Select the relevant item(s)
Step 8and click theUsebuttonStep 9
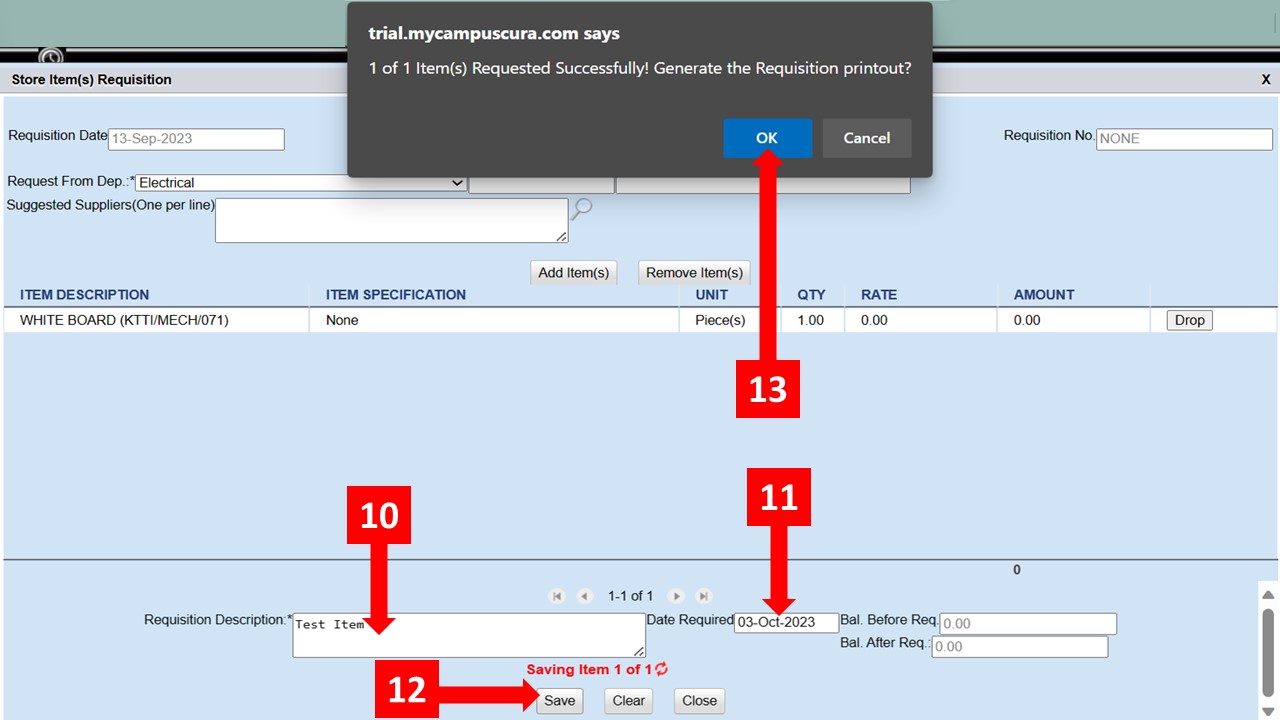
-
Add the
Requisition descriptionas shown inStep 10and set the expected delivery date for the item(s)Step 11 -
Click on the
Savebutton shown inStep 12and finally clickOkon the text box that pops up after saving -
After
Step 13a detailed requisition voucher should now pop up with a summary of the item(s)
-
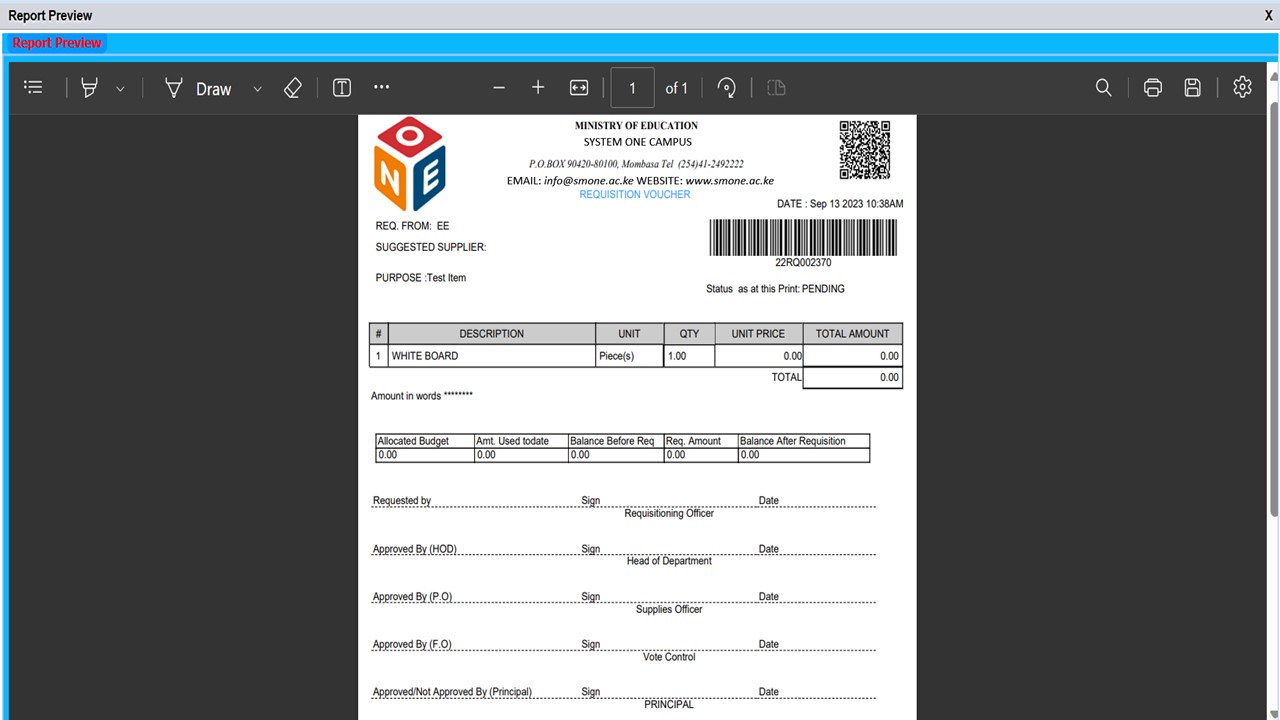
The figure below is the representation of a
Requisition Voucher
Follow these Steps to Approve Requisition(s)
-
For you to Approve a Requisition, you must be authorized to perform the operation on the record source department
-
Steps 1 & 2lead you to Requisition(s) -
Specify the search criteria, enter the search value (
Step 3) and click the magnifying lens (Step 4) to display the Requisition(s) -
Skip
Step 3to display all the Requisitions -
Select the requisition record to be Approved (
Step 5), click Process (Step 6) -
Select Approve Department/Procurement/Finance/Principal (
Step 7), and click the Approve button shown in (Step 8) -
The approval must be done in the order illustrated in
Step 7
-
Click
OKas shown inStep 9below to proceed to the next step
-
Click
OKas indicated inStep 10below, and the procurement status changes to Dept/Proc/Fin/Princ. Approved depending on the office the approval is coming from
Follow these Steps to Reject Requisition(s)
-
For you to Reject a Requisition, you must be authorized to perform the operation on the record source department
You can only Reject Requisition(s) which has NOT been Approved by the Principal
-
Steps 1 & 2lead you to Requisition(s) -
Specify the search criteria, enter the search value (
Step 3) and click the magnifying lens (Step 4) to display the Requisition(s) -
Skip
Step 3to display all the Requisition(s) -
Select the requisition record to be rejected (
Step 5), click Process (Step 6), select Reject (Step 7), and click the Reject button shown in (Step 8) -
On the text box that appears, provide the reason for rejecting (
Step 9), and clickOKas shown inStep 10
Item Receipt(s)
The following steps guide you on how to do Item Receipt(s)
- This is the next step after a requisition has been made and the items ordered
- Here, you can receive goods, view ordered items, return goods, inspect a delivery, and print a goods received note
- There are two options here, you can either receive ordered item(s) or receive general
- Ordered items have an LPO/LSO and have followed the full procurement procedure while general ones don’t have an LPO/LSO. This applies to things such as donations and grants
- Before an item can be received, the order must have been made and approved by all the relevant offices
- Follow the steps below to receive an item
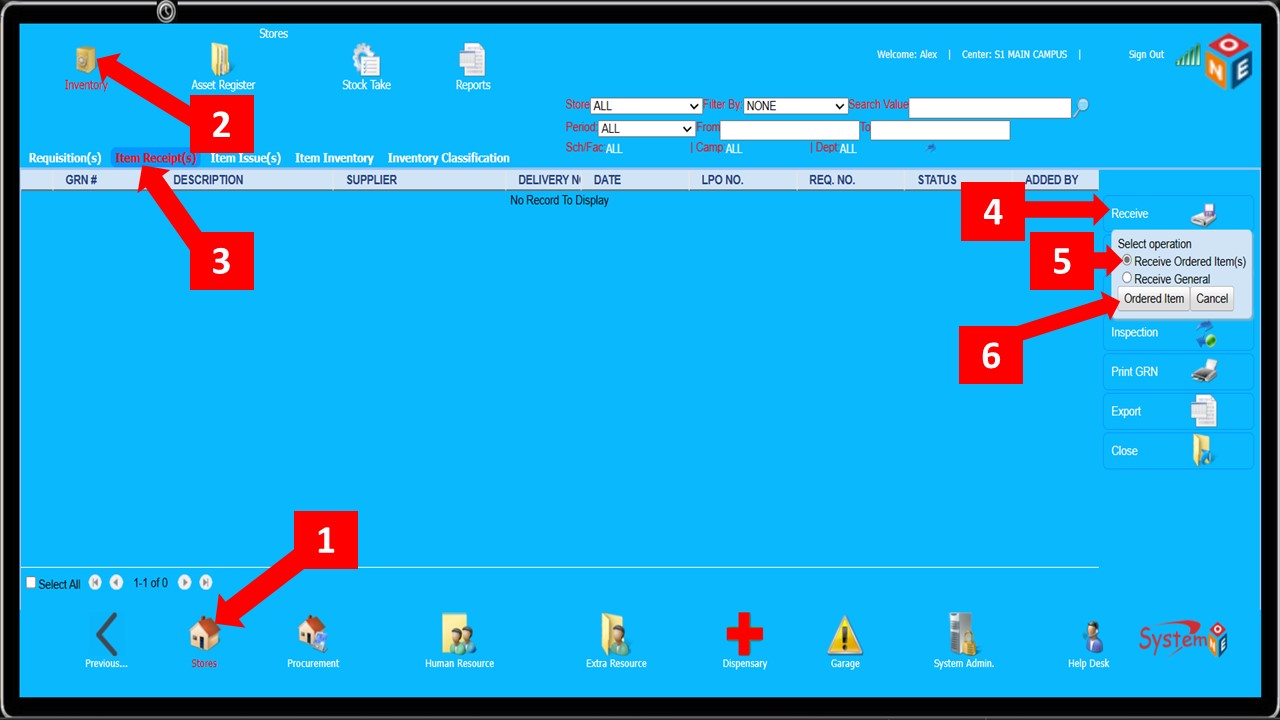
-
Steps 1 – 3will take you to Item Receipt(s) from where you receive items -
Click the
Receivebutton shown inStep 4 -
On the small menu that appears, select
Receive Ordered Item(s)and confirm your selection by clicking the button shown inStep 6
-
After
Step 6the Stores Items Received Form shown below pops up -
Click the magnifying lens shown in
Step 7and search for the supplier whom the delivery is from -
Enter the delivery details as shown in
Step 8and click theGet Undelivered Order(s)button (Step 9)
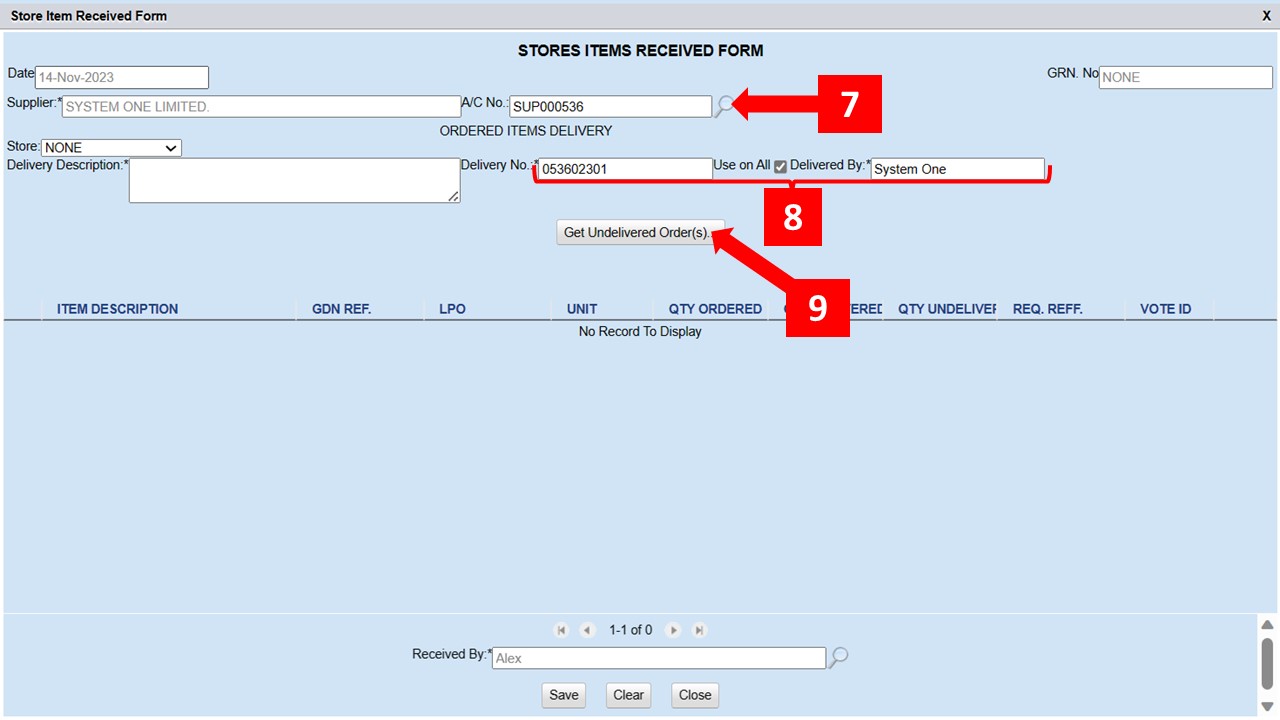
-
After
Step 9, theSearch Procurement Orderswindow shown below pops up -
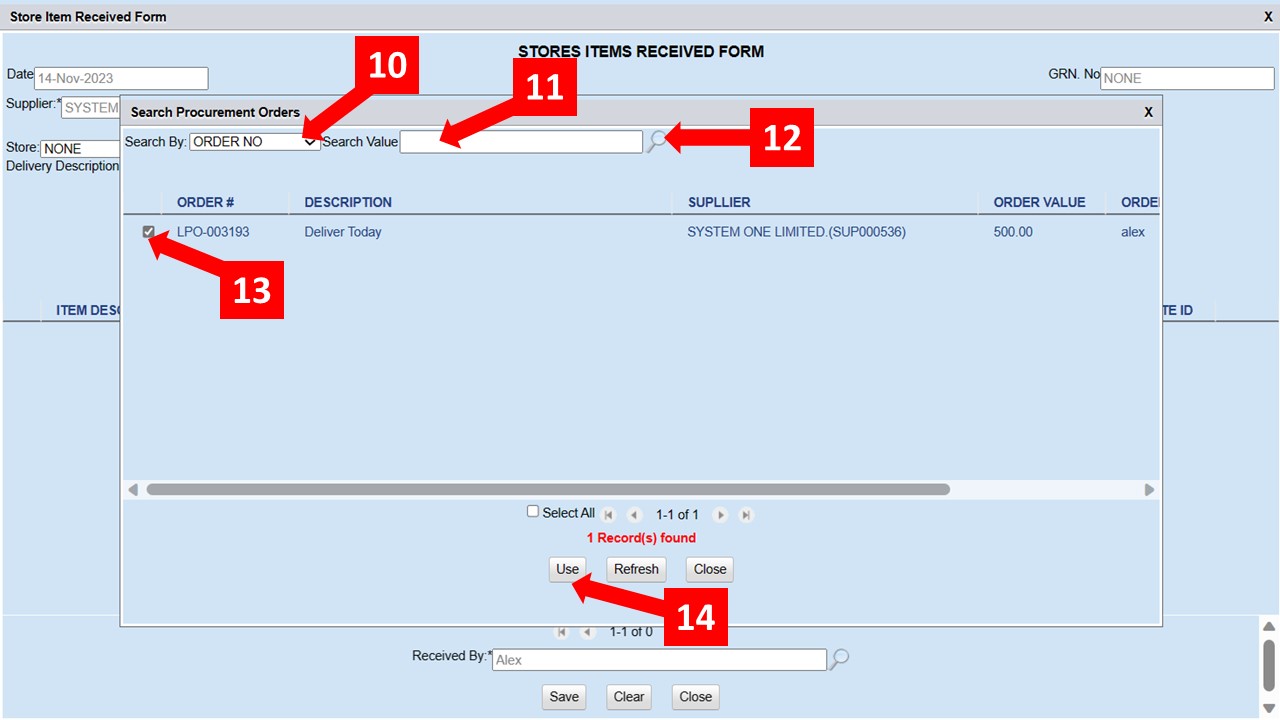
Specify the
Search Bycriteria (Step 10), enter theSearch Valueand click the magnifying lens shown inStep 12to display the pending orders NB: Only fully approved orders will appear here -
The
Delivery Descriptionwill be picked from the LPO -
Select the relevant order as shown in
Step 13and click theUsebutton shown inStep 14
-
After
Step 14, the ordered items appear as shown below -
Select the items that have been delivered as shown in
Step 15below -
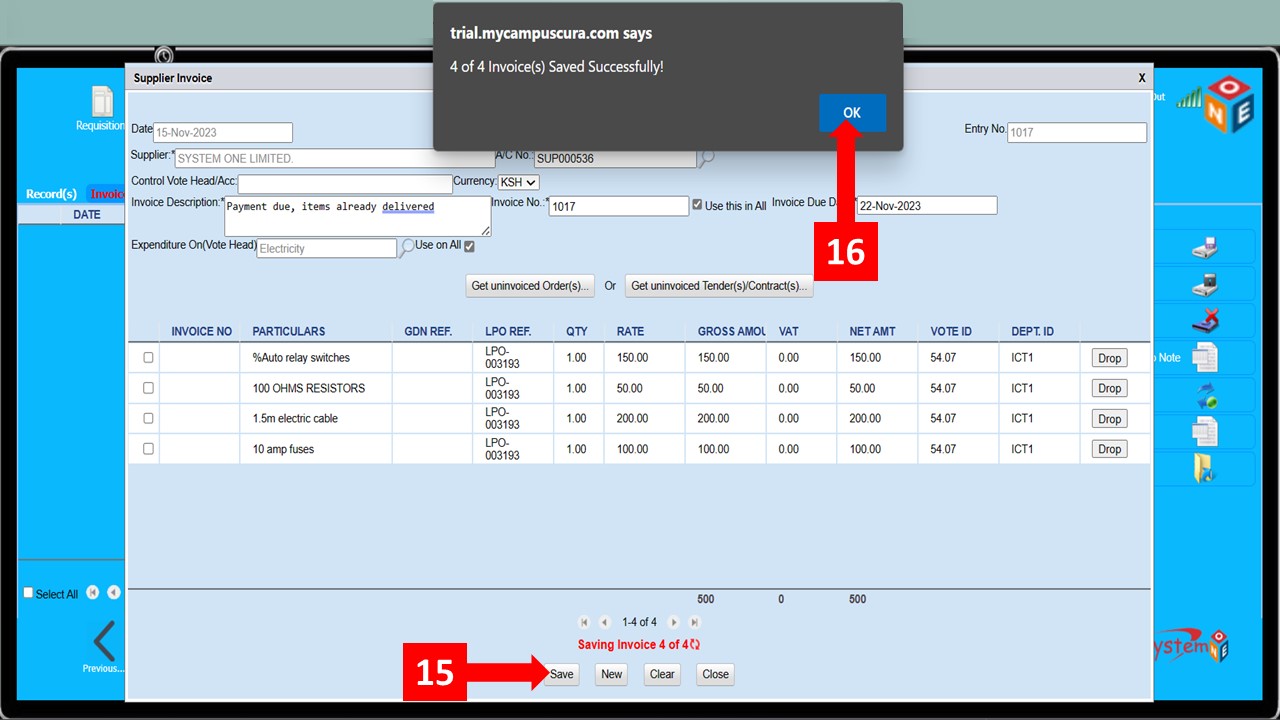
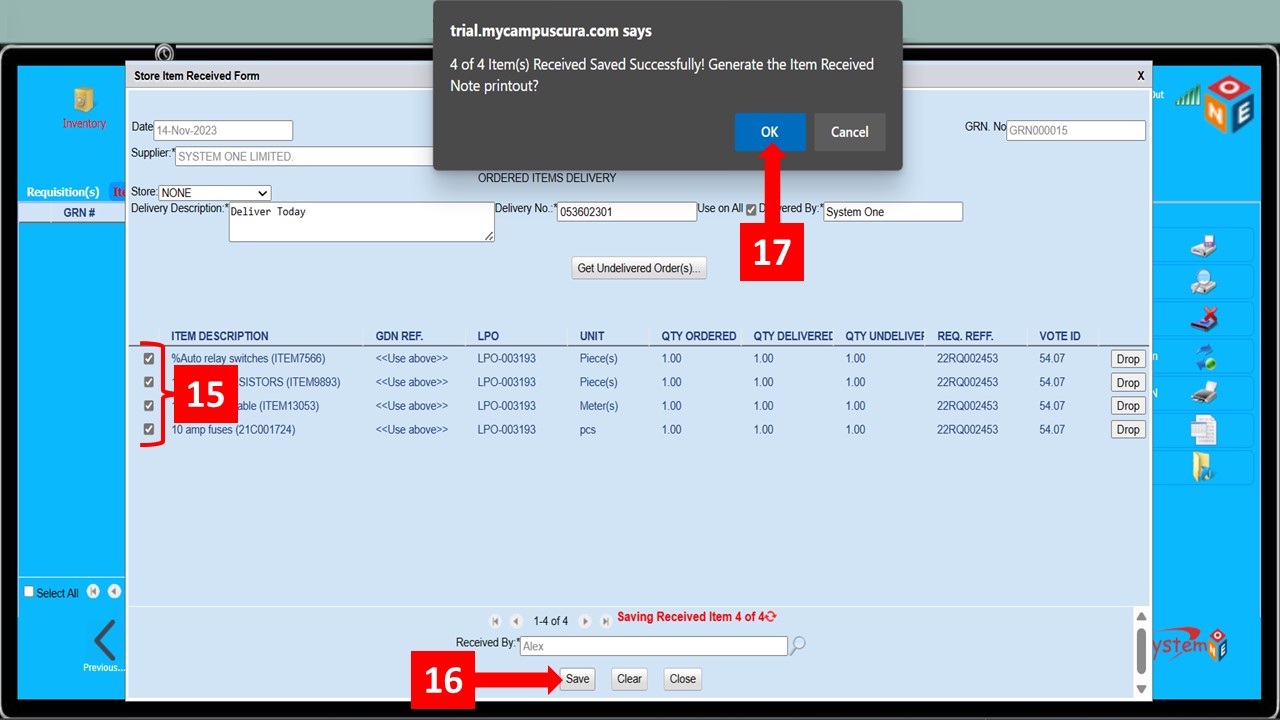
Click the
Savebutton shown inStep 16and clickOkon the text box that pops up after saving -
After
Step 16, a Goods Received Note should be generated
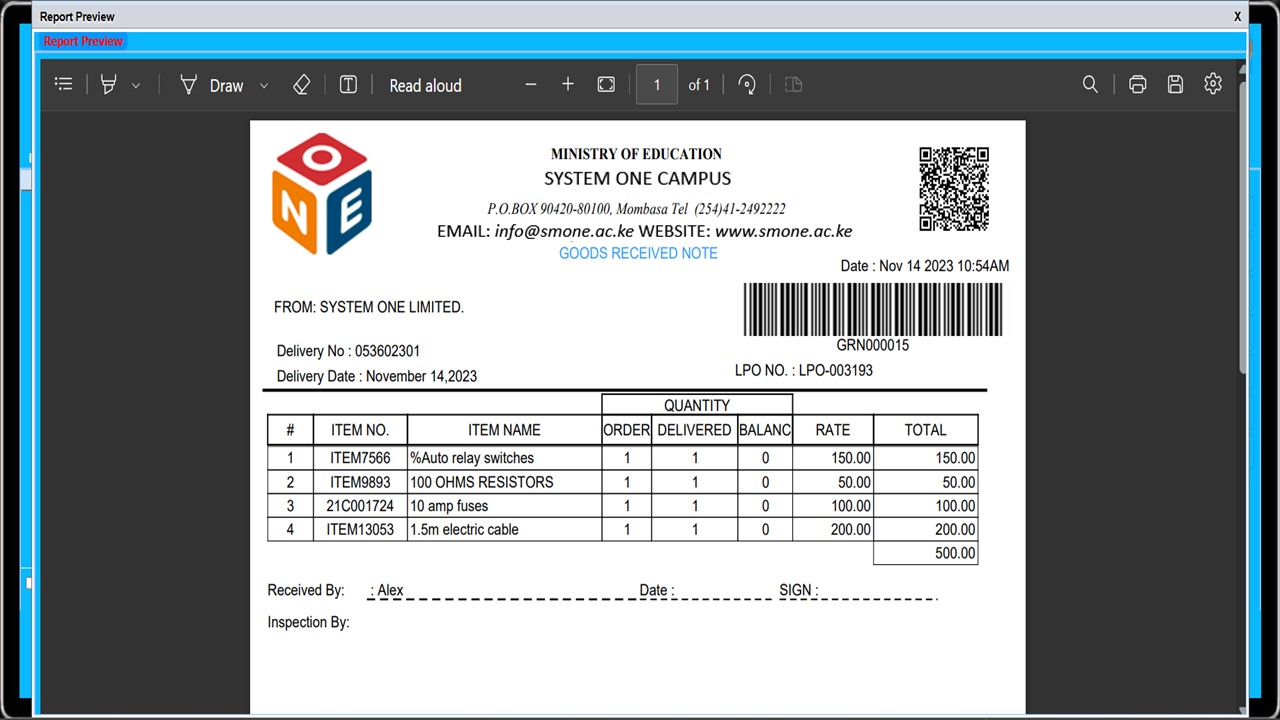
-
The figure below is the representation of a
Goods Received Note
-
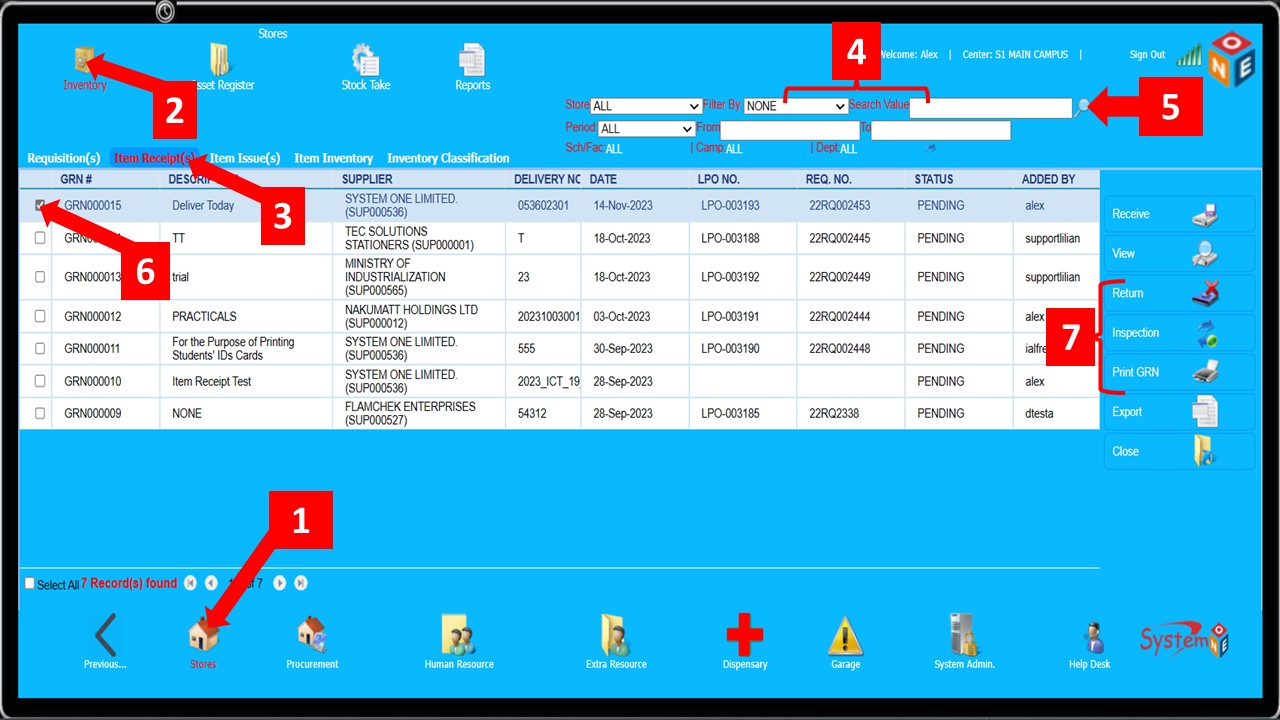
Other operations that can be done once items have been received include;
Returning,Inspection, andPrinting GRN -
Follow
Steps 1 – 3to get to Item Receipts -
Search for the
Item Receiptsas shown inSteps 4 - 5 -
Select the relevant
Item Receipt(Step 6) and select the operation (Step 7)
-
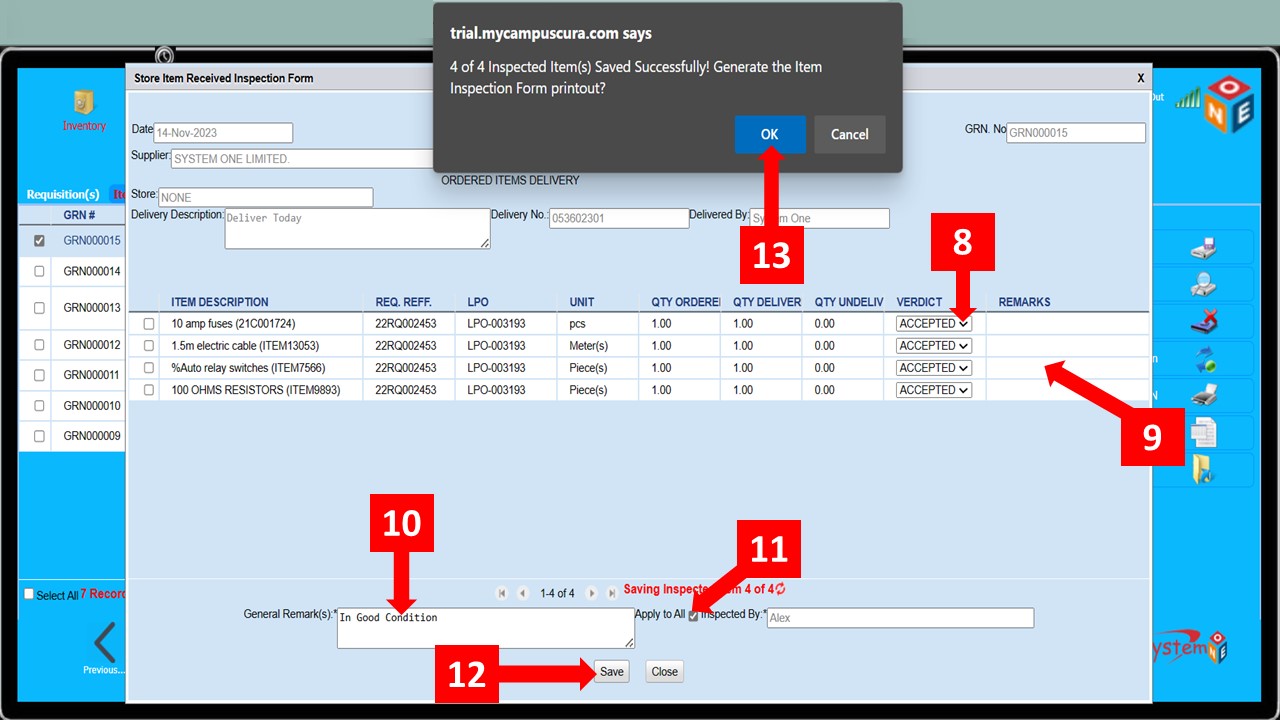
From the options shown in
Step 7above, selectInspect(This should be done by a user that had been assigned to inspect the order) -
On the Inspection Form shown below, you can select the drop-down shown in
Step 8to choose whether to Accept or Reject an item -
Enter the remarks per item in the section shown in
Step 9 -
Alternatively, you can enter the General Remark(s) as shown in
Step 10and click theApply to Allcheck box (Step 11) -
Click the
Savebutton shown inStep 12 -
Finally, click ok in the text box that appears (
Step 13)to generate the Item Inspection Form printout
Follow the steps below to inspect a delivery
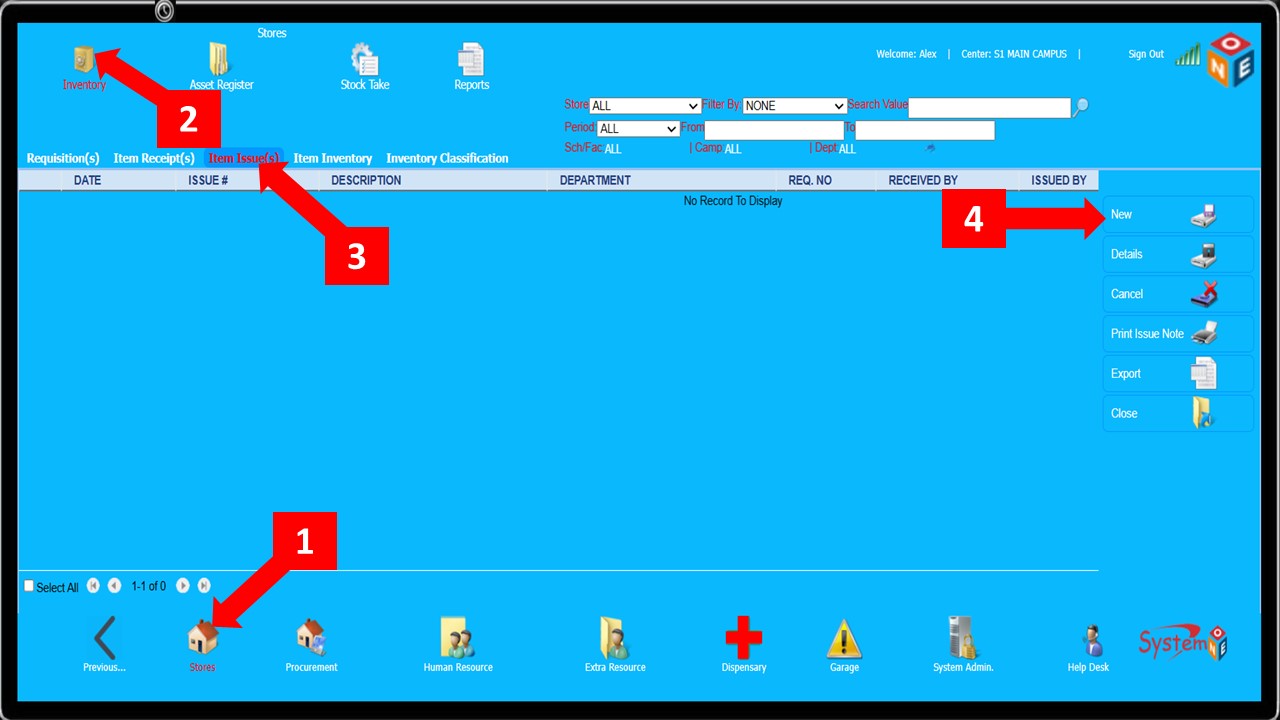
Item Issue(s)
An item must have been received and inspected (where applicable) before it can be issued
-
Follow the steps below to issue item(s).
Steps 1 – 3take you toItem Issue(s) -
Click on
New(Step 4). This takes you toStore’s issue form
-
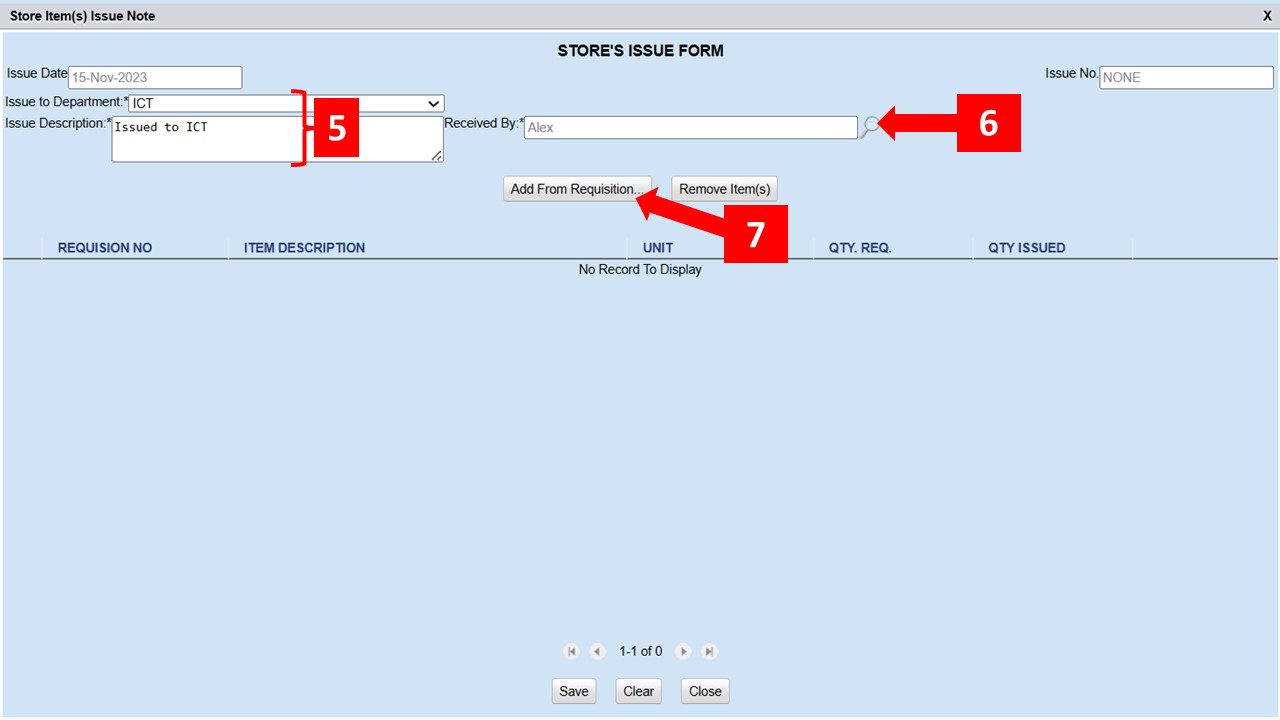
On the
Store’s issue form, select the department to which the item(s) are being issued and type the description (Step 5) -
Click the magnifying lens shown in
Step 6to search and select the officer receiving the items -
After selecting the individual receiving the item(s). Click the
Add from Requisitionbutton shown inStep 7
-
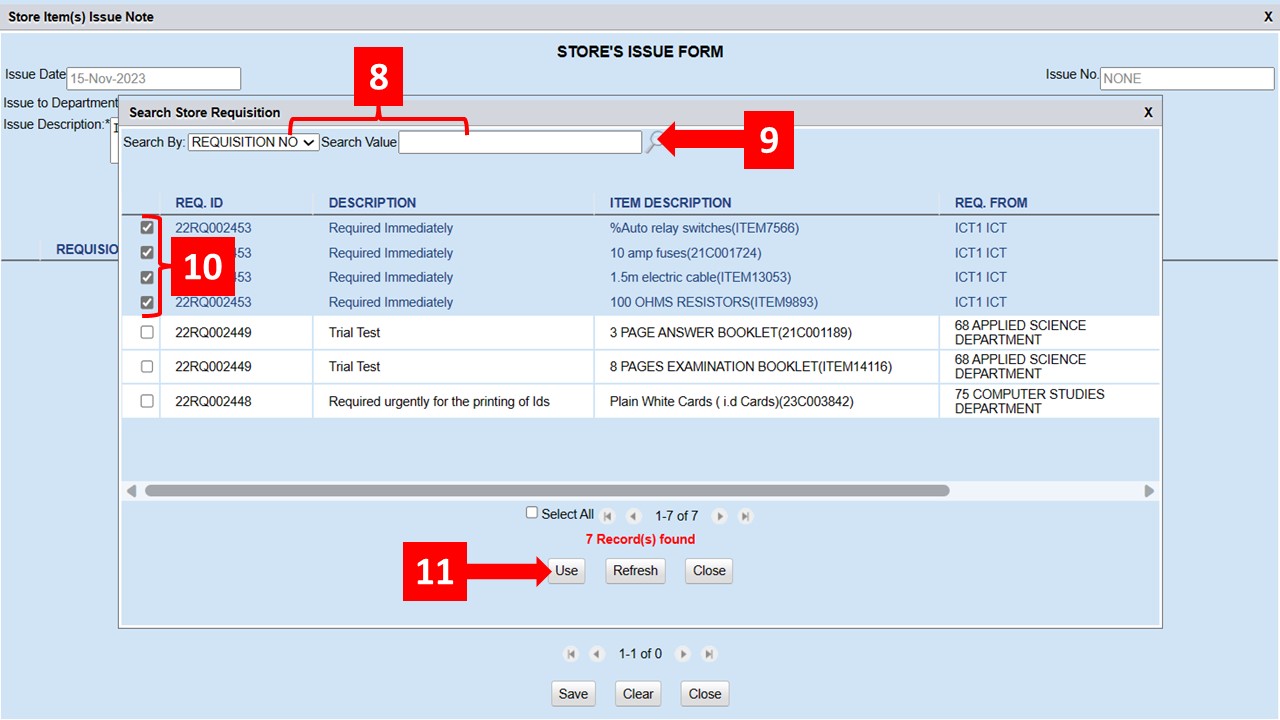
Specify the Search By criteria and enter the Search Value as shown in
Step 8then click the magnifying lens inStep 9 -
You can skip
Step 8to display a list of all the available items -
Select all the items you’d like to issue as shown in
Step 10then click theUsebutton shown inStep 11
-
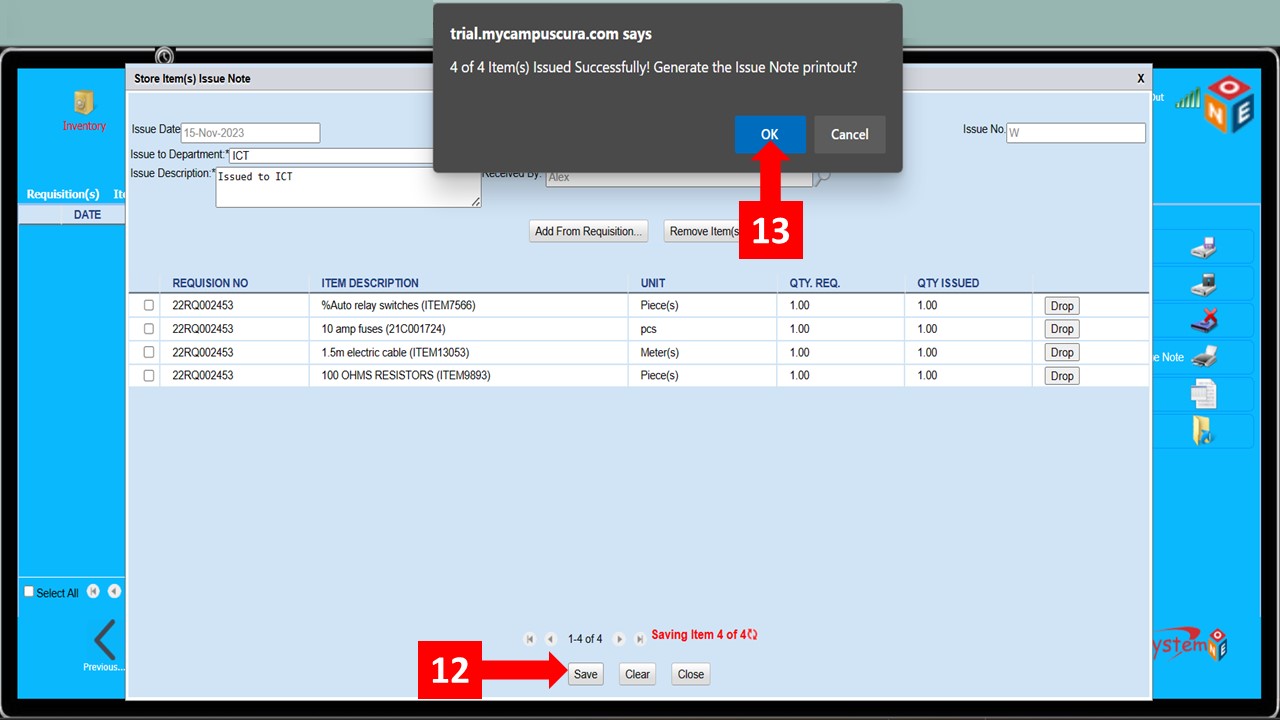
Click
Save(Step 12) and clickOkon the text box that appears after saving -
After
Step 13, an Issue Note printout is generated
Item Inventory
Comming Soon
Inventory Classification
Comming Soon
Active Asset(s)
Comming Soon
Obsolete Asset(s)
Comming Soon
Asset Classification
Comming Soon
Stock Take
Comming Soon
Reports
Comming Soon